

How to Butcher a Chicken
Do you want to know how to butcher a chicken? I butcher my home-raised chickens so that my family has access to clean meat that was raised and slaughtered humanely.
IÔÇÖve been doing this for years because my family is opposed to the inhumane treatment of animals in factory farms. In fact, I first butchered chickens with my Dad when I was a kid! So you could say I know a thing or two about processing home-raised chickens for meat.
This post is intended to show you how to butcher a chicken at home without renting or buying any special equipment. You might be interested in a plucker attachment for a drill to speed up the process of plucking. I havenÔÇÖt actually tried one because IÔÇÖm cheap thrifty.
Read my handy instructions on How to Butcher a Turkey and How to Butcher a Duck!

As an Amazon Associate, I earn from qualifying purchases.
HereÔÇÖs What You Need for Butchering a Chicken…
- Sharp knife - I try to have 2 or 3 sharp knives on hand
- Axe or Hatchet - I use a hatchet that belonged to my Grandfather
- Work Table - set up an easy to clean surface at a comfortable height
- Bucket - to catch the blood, feathers, and innards
- Container & Ice - for keeping the processed birds clean and chilled
Are You Ready?
Ok…IÔÇÖve given you fair warning…there are a lot of photos in this post to show the complete process. Readers should be advised that some of the photos may not be very pleasant to look at. ThereÔÇÖs some blood involved in this whole affair. So if you donÔÇÖt want to look at these images, you may want to reconsider butchering chickens at home.
All of the following images are of me, processing my own chickens at home. I canÔÇÖt afford a stunt double. Thanks to my family for taking the photos. čÖé

Getting Ready to Butcher
Withhold feed overnight from the birds that will be butchered. This helps to clean out their digestive tract for cleaner gutting. Be sure to provide as much fresh clean water as they want.
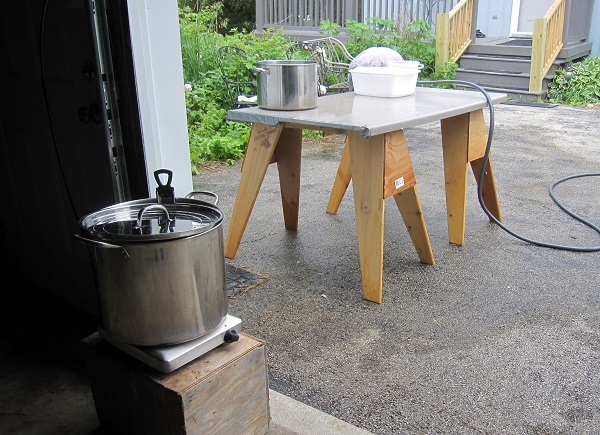
Have everything set up ahead of time. Make sure your knife is very sharp. Set up a table for final processing, a bucket of water with a bit of bleach and some rags for cleaning the knife and the table, a container for the feathers and guts, and a burner with a scalding pot (and a kitchen thermometer) all ready to go.

1. Step One - Killing the Chicken
You may use a killing cone to hold the chicken while you nick the arteries in the neck and bleed the birds out. I have tried the killing cone method and I feel that decapitation is faster and more humane…and you donÔÇÖt need any additional equipment.
As an Amazon Associate, I earn from qualifying purchases.
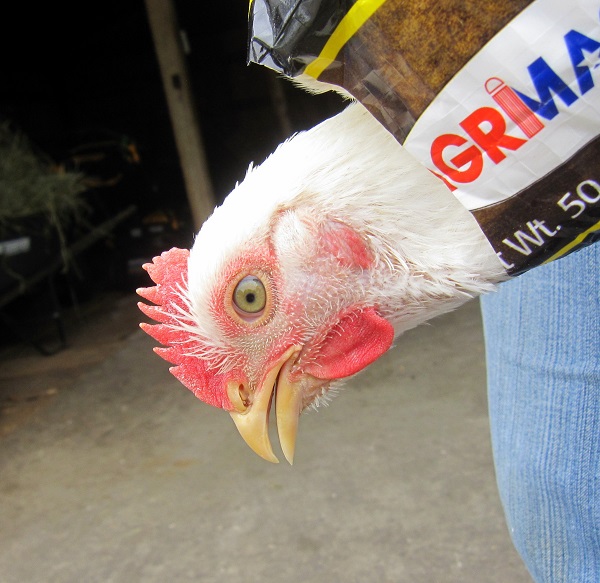
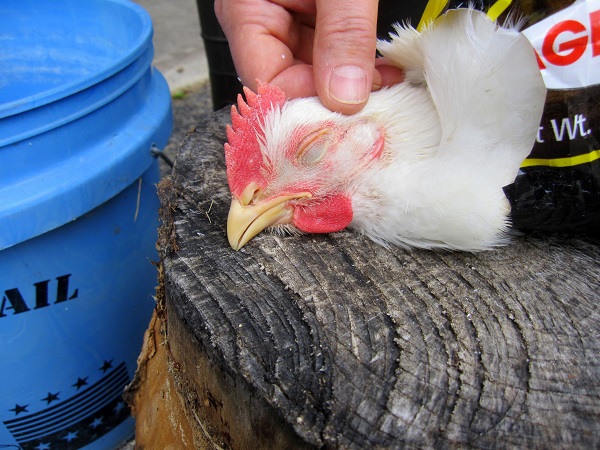
Decapitate the chicken with a hatchet or ax. To hold the bird still, put the chicken into a feed bag with a hole cut in one corner for the head to poke through. This allows you to hold the bird still so you donÔÇÖt miss the neck with the ax and also prevents the carcass from flopping around and bruising the meat.
Sever the neck with a sharp ax quickly.
Allow it to bleed out and wait for the reflexes to stop.

Wash the bird off to remove feces and dirt.

2. Step Two - Scalding for Easy Plucking
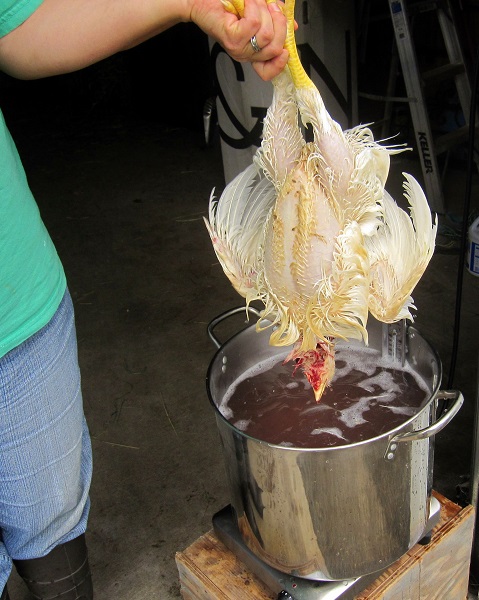
Once it is cleaned off, dunk the carcass into a pot of scalding water (145 to 150 F) for 1 minute. This makes it much easier to pluck the feathers. Be sure your water is up to the right temp before you start chopping heads off. You may want to add a drop of dish soap to make the scalding water penetrate the feathers better.
As an Amazon Associate, I earn from qualifying purchases.
Be sure to scald the feet too. This will make it easy to peel off the skin, so you can use the cleaned feet for making broth if you like.
Note: I use an extra electric burner to heat my scalding pot. If you donÔÇÖt have an electric outlet nearby you could use a propane burner. Exercise caution when working with wet birds and electricity! I use a grounded outlet that is well above and to the side of the water to prevent electrocuting myself.

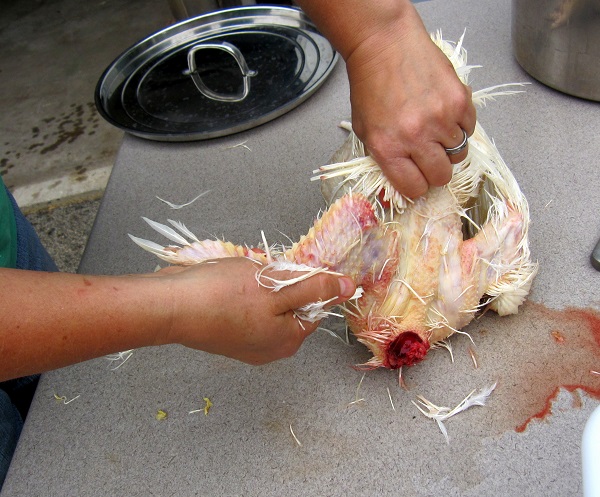
3. Step Three - Plucking the Feathers
Plucking is quick and easy if the bird is scalded properly. If the water is too cool, the feathers donÔÇÖt come off easily. If the water is too hot, the skin will cook and pull away from the meat as you pluck.
If the scalding is done properly, most of the feathers will just rub off as you run your hand over them. The wing and tail feathers require a bit more force.
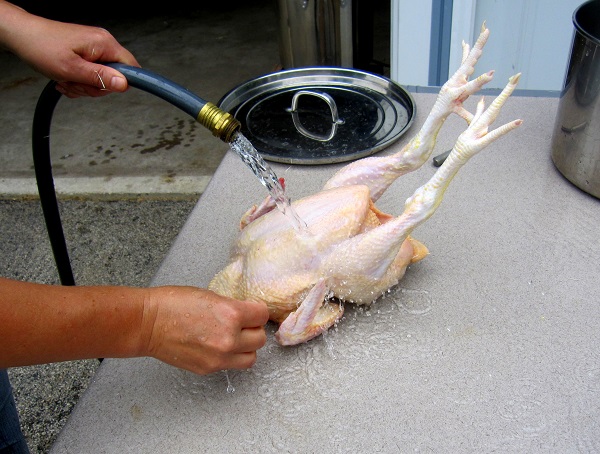
Pull the skin off of the feet if you are saving them to make gelatin or bone broth.

After plucking, give the carcass another rinse.
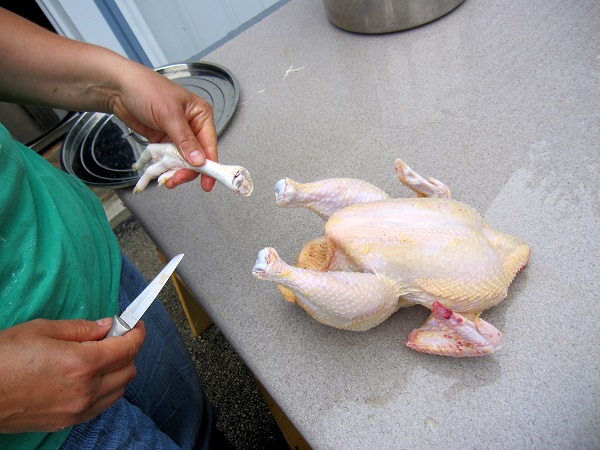
4. Step Four - Remove the Feet
You may remove the feet now, or after gutting if you prefer.
To remove the feet, locate the joint where the lower leg and drumstick meet.
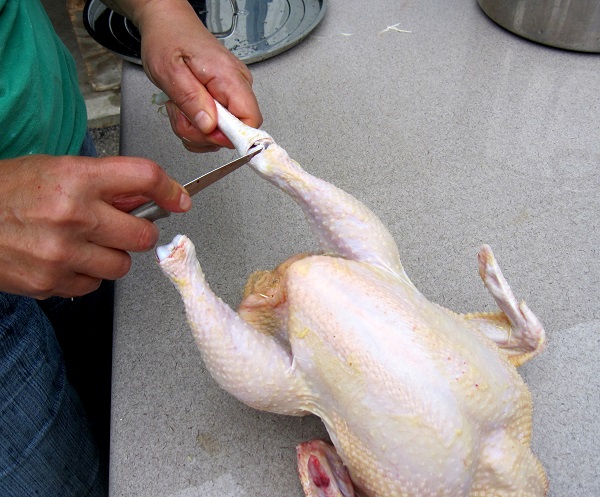
Cut through the skin and ligaments holding the joint together.

You do not want to cut through bone or cartilage, you just want to cut the stringy ligaments. Bend the joint as you work to make it easier.
5. Step Five - Remove the Oil Gland
You may remove the oil gland after evisceration also. Be careful not to squeeze the oil out onto the carcass.

The oil gland is located on the top of the tail. ItÔÇÖs the bump that looks kind of like a big pimple. Cut around and under to remove it without getting the oil onto the carcass. (IÔÇÖve read that the oil gland will give the cooked bird a gamey flavor if it isnÔÇÖt removed. I can neither confirm nor deny this, since I have always removed it.)

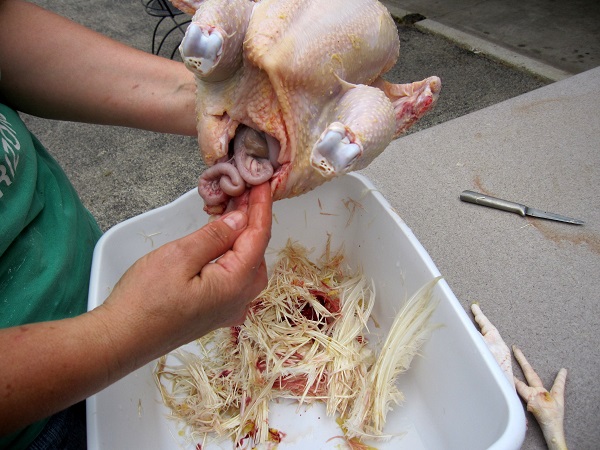
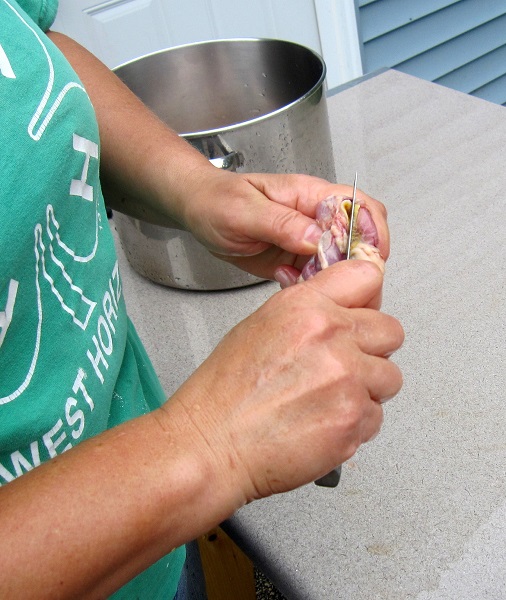
6. Step Six - Gutting
Now it is time to remove the innards. Be careful when cutting into the abdomen. You donÔÇÖt want to puncture the intestines and spill feces into the body cavity. (I keep bleach water on hand in case I do get feces on the meat. I rinse with the bleach water and then with clean water.)
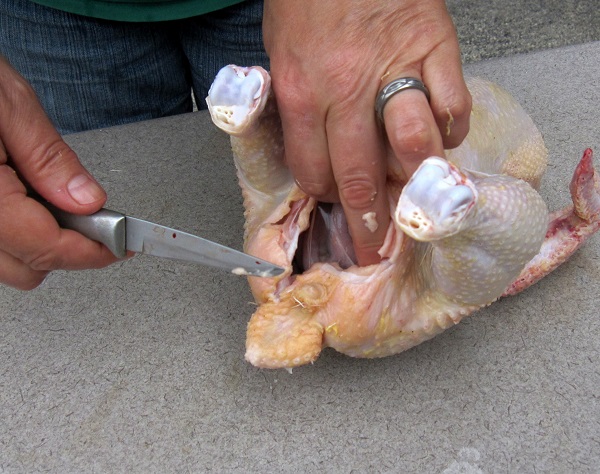
It is easier if you pinch and lift the skin of the abdomen with one hand and use a sharp knife to cut just beneath this pinched spot with the other hand.
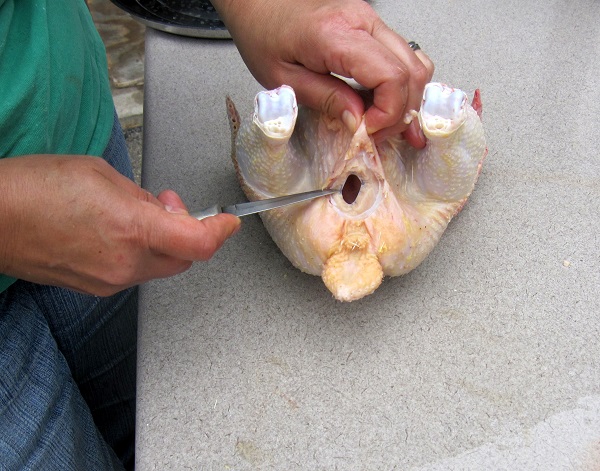
Once the initial cut is made you will see where the innards are and you can avoid cutting into them. Locate the rectum leading up to the vent.
Cut around the vent, being careful not to cut into the intestines. You may use one hand to hold the rectum and intestines out of the way. The back of the vent will be attached to the inside of the body cavity with some stringy tissue. YouÔÇÖll need to sever the connective tissue.
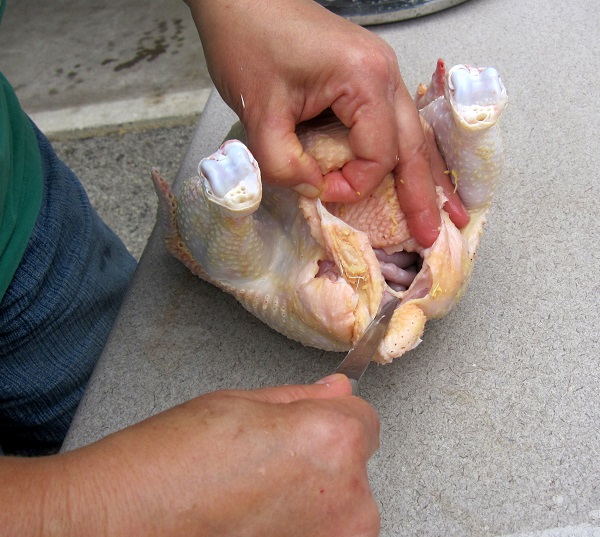
After vent is cut free, begin pulling the intestines gently from the body cavity.
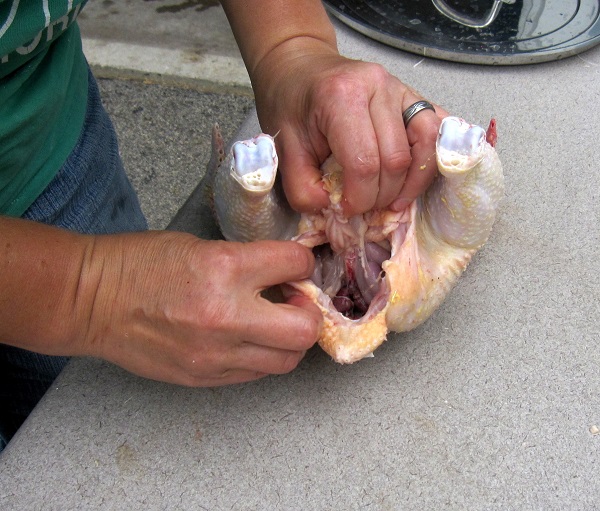
Once the vent is pulled away from the body, you can increase the size of the incision and insert your hand into the body cavity.
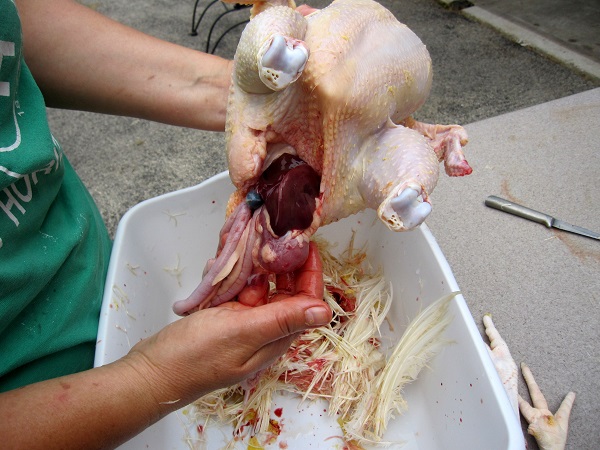
Use your hand to carefully lift the bulk of the intestines out. The liver and gizzard will be attached to the intestines.

During this process, you want to pull gently so that the intestines donÔÇÖt rupture and spill feces into the body cavity.
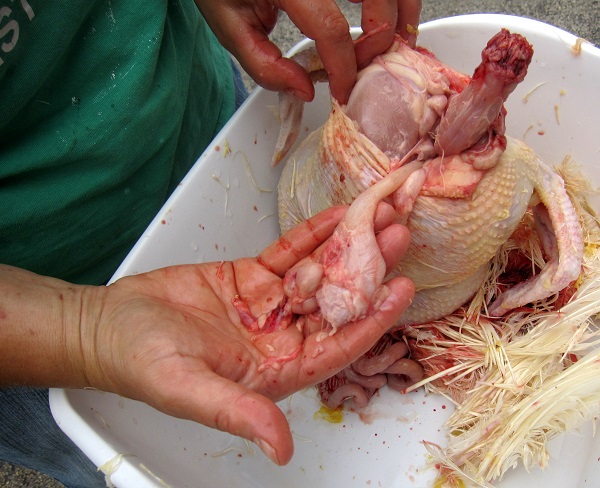
The other end of the intestines will be attached to the gizzard. Use your hand to scoop the gizzard out.
You may be able to pull the heart, liver, and crop out all in one piece. You will need to loosen the crop where it is attached to the skin of the neck/chest area to do this.
Cut the intestines away from the gizzard if you wish to save it.
If you are saving the gizzard, you will need to slice it open and clean it. Slice from hole to hole and open it up. Inside will be grit and possibly some food. Dump this out and rinse the gizzard.
Once you have the gizzard washed off, you will be able to see the tough, yellow lining. This needs to be peeled away. It is a bit tricky to get started, but then it will come off fairly easy.

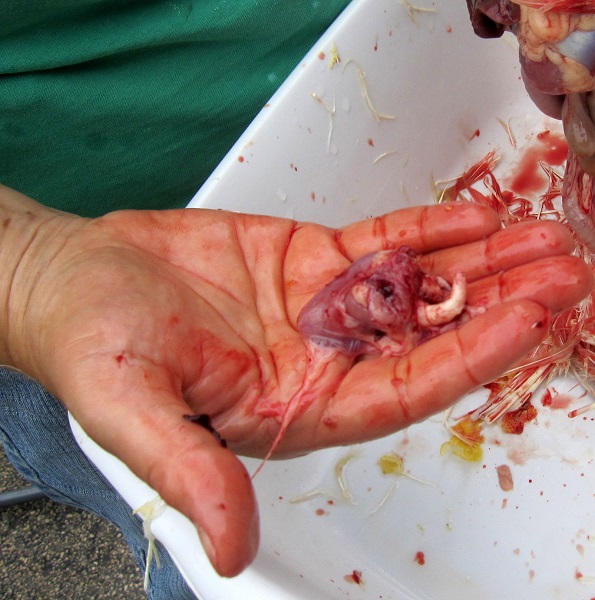
The liver has a green bile sac. This needs to be cut away without spilling the green bile on the liver. I try to cut a little bit of the liver away with the bile sac to prevent contaminating the liver with bitter bile.

The lungs are a bit harder to locate. You will find them nestled into the rib cage in the chest cavity. Use your fingers to sweep them from the rib cage. I feed these back to the chickens or cook them for the dog.

After all of the innards have been removed, rinse the carcass thoroughly, inside and out with cold water.
7. Step Seven of How to Butcher a Chicken - Cleaning Up and Chilling
If you wish, you can burn away any pin feathers with a rolled-up piece of newspaper that is lit on fire. I havenÔÇÖt found many pin feathers on the Cornish x meat birds, but older birds such as roosters and stewing hens do have them.

Now that you have finished dressing your chicken, give it another thorough rinse, pick any remaining feathers, and put it in the refrigerator for 24 to 48 hours before cooking. If the meat is not allowed to relax, it will be tough.
If you plan to freeze the chicken, you can leave it in the refrigerator overnight or you can freeze it right away. Just be sure to pull the frozen bird out and let it thaw completely before cooking it. I have had good luck with this method.
To prevent freezer burn from ruining your poultry, use shrink wrap poultry bags or a vacuum sealer system to remove air. I have kept vacuum-sealed chickens in the freezer for up to 4 years without any damage to the meat from freezer burn.
As an Amazon Associate, I earn from qualifying purchases.
- Make sure you have everything you need on hand before you start processing your birds.
- Be sure to withhold feed overnight before butchering. This will make gutting much easier, especially when you are learning. If you are butchering an injured chicken and didnÔÇÖt have the option of withholding feed, be especially careful when gutting to keep the carcass clean.
- If you are butchering large numbers of birds, you may wish to rent or buy a chicken plucker. This helps speed up the process however it is not a necessary piece of equipment and I have never used one.
- Work quickly and carefully. You want to chill your birds quickly to prevent the growth of nasty bacteria. But donÔÇÖt sacrifice your own safety…be especially careful when you are using the hatchet or knife. The last thing you want is to end up in the emergency room with an injury.
- ItÔÇÖs best if you have a helper on hand to share the responsibilities. If you are working alone, keep your cell phone in your pocket in case you get a nasty cut. Safety first!
This tutorial is intended for educational purposes. If you engage in these activities, you do so at your own risk. This is how I process my chickens. You may find other ways that suit you better.
As an Amazon Associate, I earn from qualifying purchases.

Hi Lisa, thank you so much for such a detailed blog post! I wish IÔÇÖd found it prior to hubby and I doing our very 1st homekill earlier today, there were some great idea IÔÇÖd like to have used, especially the feedbag one! I have a question about the smell of the bird after dispatch and evisceration. We were careful to not break open the crop or intestines or the oil gland, and I rinsed the bird very well with cold water after gutting but it still smells a little odd, kind of dusty/dirty smelling but not rotten or anything. Is it normal to have a smell? It did take us about 30 minutes to get it done as weÔÇÖre newbies, still learning our way around the bits and pieces, and didnÔÇÖt want to make a mistake, this was our first ‘practiceÔÇÖ bird. Hopefully we get quicker as we do a few more in the comin weeks.
Great article, and a fantastic resource for all of us chicken farmers:) Figuring we pay up $3-4/lbs for a butcher to do the work for us, this can be a huge cost saver.
Cheers!
Thanks, WT! It can be a tough job to do, but butchering them myself means I know that it is done as humanely as I can manage. And you are right, the cost of processing is very high.
We just cooked our first butchered chicken. We cooked it in the pressure cooker and it was tough. Should we have soaked it over night first or put it on ice for a while? The bird was only about 5 months old.
Hi Laura,
It is best to refrigerate your poultry for at least 24 hours before cooking. You should be able to keep it in the fridge for up to 3 days to allow the muscle tissue to ‘relaxÔÇÖ. However, I have found that my free range chickens are never ‘tenderÔÇÖ when butchered after 2 or 3 months of age…unless I pressure can them. I think that pressure cooking them when they are covered with broth should have the same effect as pressure canning them. It is something I want to try, when I have more stewing hens to process.
They seem to toughen up once they begin to mature and crow or prepare to lay eggs. The hormones seem to have an effect on the meat.
You can also cut the meat off of the bones and run it through a meat grinder…that turns out wonderfully. IÔÇÖve also cooked the bird, pulled the meat off the bones, and then put it through the grinder. I wrote about making sausage from tough old ducks and chickens in this post…
https://www.theselfsufficienthomeacre.com/2015/01/how-to-make-duck-chicken-sausage-patties.html
Great work.
Thank you
Thank you, Troy…happy to share.
Thank you very much for your very detailed post. I surely thought I would be prepared to begin butchering down the six hems I got from someone that no longer lay, but hit a few stumbling blocks and would like to know your thoughts.
ItÔÇÖs been 18 years since I last butchered anything, when I was just this side of 14 helping my mom with chickens and rabbits, and IÔÇÖve got 5 more hens to do. My distinct lack of grace despite having done this before has me nervous.
Firstly, scalding did not work for me at all. I monitored my water temperature and it was about 155. I dunked the bird a few times and even let her sit and soak for about 30 seconds, but could not get any feathers to really pull free easily. SheÔÇÖs one of the lowest two on the pecking order and had a lot of feathers regrowing; could this be the reason for my troubles? I have another girl that is just as low and has about the same thing going on. Lots of regrowing feathers. Any tips beyond what you included above? I have no memory of how we used to pluck our birds.
Secondly, and most important, I accidentally opened the crop when I was trying to skin her since I couldnÔÇÖt pluck her and was trying to work quickly. I quickly washed everything away into the sink with cold water and down the disposal, so I donÔÇÖt think there was anything that touched the meat directly. Is cutting in to the crop a danger area that may have poisoned my meat, or is all of the danger located inside and at the tail end?
Lastly, she has/had quite a bit of fat deposits that I am assuming are normal. Should these be removed while butchering if IÔÇÖm skinning?
My sincerest thanks for anything you could offer.
Hi Nicholas,
I think itÔÇÖs great that you are doing this again, good for you!
It sounds like the hens you describe were coming to the end of a molt, when they replace their feathers with new ones. This happens once a year and they stop laying during this period to put their energy into the new feathers. It shouldnÔÇÖt change the effectiveness of scalding the carcass.
When I scald my birds, I try to get the temperature of the water to about 145 to 150F and I let the bird stay in the water for one full minute, swishing it around to get the hot water into the feathers. This usually works quite well. Maybe you didnÔÇÖt leave the bird in long enough to really loosen the feathers for easy plucking. DonÔÇÖt worry about not being graceful! When you scald the next one, if the feathers seem to be hard to pull out, just put it back in the scalding pot again and then test the feathers…they should come out easily as you run your hand over them.
The contents of the crop, in the neck, is the food that the chicken just ate and it shouldnÔÇÖt contaminate the meat. I know that people warn that getting the contents of the guts on the meat will contaminate and poison it, but I have done it and washed the bird thoroughly then dipped it in water with bleach to kill the bacteria. This is what happens at the slaughter houses. In fact, IÔÇÖve read that they sometimes use formeldehyde in the chilling bath to kill the bacteria on the chicken carcasses. From what I understand, they use the same water to chill thousands of birds and it would be a bacterial soup if they didnÔÇÖt add the bleach or formeldehyde to kill the nasty stuff. So our home butchered birds have got to be cleaner than that!!!
To avoid having this problem in the future, just withhold food for a day before you butcher. Make sure they have clean water. Withholding the food will make it easier to gut the chicken without getting feces (or food from the crop) on the meat.
The fatty tissue is a personal choice…some people leave it on the bird when cooking and other people remove it to use in place of lard for frying foods. I usually feed it back to my other chickens, but have been thinking about using it for frying next time. IÔÇÖve been told it is delicious. I just havenÔÇÖt used it because I have never really liked fat on my meat.
I hope that this helps! Best wishes with the rest of the hens. čÖé
ok
Quick question. My daughter in law and I have butchered Chickens several times now but this last time we stored cleaned birds in our coolers. She thought one big bag of ice would be enough to cool them but when we went to place them in the freezer 2 1/2 hours later, all the birds were quite warm upon removing them. Are they still safe to eat? How long before the nasty bacteria begins to grow? I wanted to throw them, but I was told not to.
Sign Me Concerned in MI
Hi CatinHiding,
In all honesty, IÔÇÖm not completely sure. But my feeling would be that if you wash them thoroughly and cook them until the meat is falling off the bones, you will kill all the bacteria and they should be safe. The biggest problem would be undercooking and then consuming the meat.
I hope you are able to use them.
Do you have a recipe (crockpot or pressure cooker) that youÔÇÖd like to share with everyone, using a tough old roo?
Hi Isabeau,
I havenÔÇÖt shared a recipe, but shared my thoughts about cooking old hens in this post…
https://www.theselfsufficienthomeacre.com/2015/11/the-best-way-to-cook-stewing-hens.html
Thanks for asking…IÔÇÖll try to share some recipes in the future. čÖé
Thank you so much for your detailed post and for including such clear pictures. I had to butcher a chicken for the first time tonight (she had killed 5 of her 8 chicks and then tried to kill another hens chicks as well) and I felt so much more confident after reading through your post (10 times!). I didnÔÇÖt do everything quite right - one of my knives wasnÔÇÖt sharp enough - which meant the initial killing part was longer than I had hoped, I mashed the liver on the way out - so couldnÔÇÖt use it, and didnÔÇÖt get the legs tied down in time - and now they are awkwardly pointed out the back - but all in all IÔÇÖm counting it a success. Thank you again!
Hi Miss Adora Belle,
IÔÇÖm so glad you could take care of the situation yourself. ItÔÇÖs too bad your hen was killing chicks…thatÔÇÖs terrible čÖ? Most breeds have had their natural mothering instincts bred out of them. I hope you never have that happen again.
So glad that my post helped! DonÔÇÖt sweat the little stuff…I still have things happen now and then that make me realize I have more to learn. čÖé Thank you for leaving a comment…IÔÇÖm always happy to hear from folks! Best wishes with your chicken adventures!
Lisa,
I had to cull my rooster today due to city and HOA restrictions. IÔÇÖve never witnessed or participated in this before. I read and re-read your tutorial several times. I was able to accomplish this by myself as a complete novice but feel horrible about it.
In my neighborhood we have irresponsible parents and pet owners, but a well cared for rooster is forbidden. My next home will be a farm. I may become a vegetarian, at least for a while.
Hi TS,
I hope that my post helped get you through this tough responsibility. I understand your frustration completely. We moved from our last home to our current property because we couldnÔÇÖt have any farm animals at all. No chickens, period. It seems rediculous that people can have a couple of large, barking dogs out in their yard at all hours of the day, but not a rooster. Not that IÔÇÖm opposed to dogs, I have 2 large, barking dogs! But I donÔÇÖt leave them out all day to bark at every thing.
IÔÇÖm sorry that you had to butcher your rooster. It is a tough thing to do when you raise your chickens and care about them. I made the decision when I first brought home chickens that they would all be butchered eventually, so I know what IÔÇÖm getting into. But not everyone wishes to do this. I hope that you are able to move to a farm and have a rooster soon.
Best wishes!
I harvested my first chicken last week and had some questions about it. First of all tho chicken was around 2 years old and had stopped laying. After I plucked her almost all of the holes that the feathers came out of had some black mucus like material in them. I wasnÔÇÖt sure if this was normal or maybe this chicken was sick? Is it just dirt due to her fondness of rolling in the dirt or something else. Other than that my first attempt went almost flawlessly. I hung her upside down and cut her jugular and she didnt even struggle at all. Thanks for the very nice post.
Hi Mike,
IÔÇÖm happy to share this info for folks who want to butcher their own chickens. I hope it was helpful.
IÔÇÖm glad that you were able to handle this all youself and the hen went quietly for you.
When I butcher birds that have dark colored feathers, there is often some dark colored goo in the feather shafts and sometimes in the holes where the feathers came out. I think it is new feather growth, with the dark colored pigment for the feathers. It isnÔÇÖt anything to worry about. I hope that this helps!
Good job!
Thanks for your post. I have never butchered a chicken before. I have seen it done. And it just looked like a dirty process to me so I decided I wasnÔÇÖt going to start doing it. But your post have helped a lot. I want to start using our own meet. So this is a huge help!
IÔÇÖm glad that this is helpful! Thanks for leaving a comment to let me know. čÖé
I canÔÇÖt say that it is clean or smells nice when you butcher an animal…the smell is worse to me than the blood and guts. But if you want to have your own meat and you donÔÇÖt want to pay to have someone else do it, there arenÔÇÖt very many options. Best wishes and I hope that you have a successful butcher session!
Living on a small holding in England we gutted 10 “retired” layers this morning with the kids helping to various degrees, cooked in a pressure cooker and enjoyed as Thai chicken curry for dinner. I am pleased to be part of a community of people who are taking responsibility for the meat that the eat and the welfare of the animals. We had a debate, while gutting, if it was better to kill lots of chickens or one cow for the same amount of meat. We purposefully do not feed chicken “bits” back to the flock from the understanding that this encourages cannibalism - I would be very interested to hear other views on this.
Hi Suzanna,
What a great way to teach your children to be responsible in their meat consumption! I commend you čÖé
The question of whether it is better to butcher many chickens or one cow is interesting. I tend to think that chickens are much less intelligent than cows, so maybe it is better to butcher them than a cow. But then you are taking many lives compared to one. For me, I donÔÇÖt eat much beef so I would prefer chickens and I think they draw fewer resources from the environment than cattle so they have a smaller carbon footprint.
I understand why it would seem like feeding chicken parts back to the flock might cause cannibalism. However, I have never had that problem and my flock gets the ‘leftoversÔÇÖ from butchering quite often. I think the bigger issue leading to this problem is insufficient feed or feed that doesnÔÇÖt contain all of the necessary nutrients. If poultry do not have all of the nutrients they need, they will try to find them wherever they can. Also, a flock that is stressed by crowded living conditions, 24 hours of light a day, or other less than ideal conditions, will be much more likely to start picking at each other to the point of serious injury.
Thanks so much for visiting!
i know this is a post from 2015 but just wanted to leave my 2 cents!! we had 25 buff chicks in plastic tubs inside til they feathered out then we move them outside. the netted cage we put them in was 90 x 36 x 36. they began canalbalizing after a week or so until I finally caught on what I was doing wrong. I lost 5 chicks learning to not over stuff a cage. we divided them up and viola, all ok!! similar thing happened with our dominiques and I only lost 2 before I figured it out!! good thing God made a lot of chickens!!! star in texas
Hi Again Lisa
exactly how do you feed the blood back to your flock?
Norm
Hi Norm,
The blood coagulates after a few minutes in the bucket. I just dump the whole mess into their pasture and they clean the coagulated blood up in short order. čÖé
Thanks for visiting!
Well, we have a rooster that has to go. We will probably do the deed next weekend. Great post but I need clarification on one thing. How are you hanging the bird?
Hi Dave,
I hang them with a piece of clothesline tied around their leg. Hope this helps! Best wishes čÖé
Great article. The last batch of chicken hearts I got from my local farm were loaded with coagulated blood-I removed as much as I could but is it necessary to do that?
Thanks, Ellen! It is not necessary to remove the coagulated blood…just a matter of personal preference. People used to use the blood to make a savory pudding! So it is edible, but most people donÔÇÖt save it these days. When I butcher, I feed the blood back to my flock and they love it.
Hey there. I was wondering how big your stock pot is to boil them in to loosen the feathers…? thank you for the detailed post čÖé čÖé
Hi Michel,
I believe that itÔÇÖs a 5 gallon stock pot…itÔÇÖs about the same size as my 5 gallon buckets. Glad that you found my post…thanks for stopping by!
I have already dressed and put my chicken in the freezer. We did this about 2 weeks ago. We tried to eat one tonight and way too tough. I guess we should have let them rest for 2 days before freezing. I did this with my mom when I was a girl and we did not let them rest. Anyway, what can I do now. Do you think defrost the chicken and let set in frig for a couple of days? I am disappointed because is tough.
Hi Mart,
If it isnÔÇÖt a young chicken, it is likely to be tough. I pressure can my old chickens to make the meat tender. It is disappointing to butcher a chicken and find it too tough. YOu can also grind the meat and that will make it very tender!
hi. If I have multiple chickens to butcher I get set up very similarly to what you do. However, I do something a bit different. . . . I cut the bottom out of a 1 gal. bleach bottle-they are more sturdy than milk jugs (commercial). I cut it so one side is cut lower than the other. The longest side, I nail to a wood post, and put a garbage bag lined 5 gal. bucket under to catch blood and offal. When IÔÇÖm ready to butcher, (Oh yeah, I also cut off the neck of the bottle, so in essence IÔÇÖve made a big funnel. Cut the neck of the bottle off so itÔÇÖs big enough to ‘dropÔÇÖ the chicken in to, and itÔÇÖs head comes out the neck of the bottle, hanging over the bucket. I pet and thank the chicken. I then hold it upside down by its legs. Soon, it calms and quits moving around much. Then I gently lower it in to my ‘funnelÔÇÖ, and cut the throat so it bleeds into the bucket. After that, I pretty much follow your process.
Hi Gale,
I have thought about doing that and I have used a killing cone in the past. I just felt better about chopping off the head and ending the chickenÔÇÖs life instantly. But I understand that a lot of people wish to bleed them out. It sounds like you are doing a very humane job! Thanks for sharing for folks who would like to try it. Maybe I will change my mind and start bleeding them out again.
I find this very well written. Thank you!
Thank you čÖé
I loved your article, I just started raising layers this year and I am considering raising some to butcher in the future as well.
Once you butcher and you decide to freeze what do you freeze them in? Freezer bags? Vacuum sealed? What methods do you know or recommend for freezing? (ie best/normal method, and worst case scenario method)
Thanks, Joshua! I have used regular freezer bags…ziploc type…but you need to use them quickly or they get freezer burned. The vacuum sealing system works the best. I have some chickens that I butchered almost 2 years ago that are still good in those. My freezer keeps the food at zero degrees Fahrenheit and that works well.
It is best if you can let your chickens sit in the refrigeratoe over night before freezing and when you take them out to use them, defrost completely before cooking. Other wise they can be a little on the tough side. Laying hens are best if you cook them and then pressure can the meat. Best wishes!
Thank you for posting such a detailed description of your process. My wife and I moved out to the sticks to be more self sufficient and live a much more “simple” life. First we got layers. Lots of egg layers. We share our eggs with our neighbors. Now we also have turkeys that we are raising for meat. We also just ordered 100 Cornish X for meat. Our neighbors are helping with everything. Hopefully next year we can add a few pigs to our homestead.
Hi Eric,
ThatÔÇÖs great that you and your wife have been able to move to the country and start living a more self sufficient life! Congrats on all the great things youÔÇÖre doing. ItÔÇÖs wonderful to have neighbors who are so helpful too.Best wishes with the meat chickens and the piggy plans. I hope this post is helpful when processing time rolls around. čÖé
Thanks for visiting!
This is great info!! IÔÇÖve known for awhile now that the time is coming for me to learn to do this, myself. Right now I have 3 cockerels that need to go..IÔÇÖve tried to give them away, no one wants them. IÔÇÖve asked locals for help, so far no offers. But I canÔÇÖt take the fighting anymore. I need to find a big pot for the scalding. Do you have a special area that you do this? Outside, Inside? I used to help my parents when I was a kid, weÔÇÖd sit around the kitchen table plucking and learning anatomy.
Wish me luck!! čÖé
Good luck, Tina! IÔÇÖm sure that youÔÇÖll do just fine čÖé If you want, you can skin the chickens instead of scalding. I have a post about it that might help. Just search for skinning a chicken čśë
I do all of my butchering in the garage and driveway. IÔÇÖd like a dedicated area, but it wonÔÇÖt happen at this homestead.
ThatÔÇÖs great that you had the lessons early on…one of the best things a parent can do for their children is to teach self sufficiency skills!
Thanks so much for this post. I am interested in raising my own chickens for meat this year. I have a few laying hens that run amok all over my yard and they are getting to that age of stew pot time. They have been little friends for some time now and will even sit on my lap looking for treats. I canÔÇÖt stand the thought of the how animals are treated at these bulk farms and I really want to raise my own. Sometimes the cost can get high and by butchering my own I would save $2 each by not having the Amish down the road do it for me.
I have butchered many, many deer so I understand some parts but have never attempted chickens.
Thanks again.
New follower as well.
Bushman
2015 A to Z Challenge Ambassador
@jwb81074
Hi Jeff,
IÔÇÖm glad to help out! It sounds like you wonÔÇÖt have any issues once the dispatching part is done. There are a lot of parts that are very similar to butchering an animal such as deer, rabbits and squirrels. The biggest difference is how the pelvic bones are shaped. When I used to butcher rabbits, I remember that the intestines and colon have to be ‘threadedÔÇÖ back through the pelvis. With chickens and other poultry, the pelvis is open.
Best wishes with putting those old ‘ladiesÔÇÖ to good use in your stew pot! They make excellent broth.
Wow, thanks for such a detailed post. Last year was our first year raising chickens for eggs (and pets). I wanted to butcher some meat birds but had no idea how to go about the process. I shared this post with the Mr hoping he will take on the task with my help this year.
Hi Mandy,
Thank you for reading! IÔÇÖm glad that it is helpful čÖé Best wishes with your meat chicken dream! I hope your hubby is on board. čśë
IÔÇÖm so thankful for your tutorials - weÔÇÖre first year chicken owners and had to dispatch of three wounded, on a day that the person that was going to teach us how to butcher happened to be in another province. I donÔÇÖt know how IÔÇÖd learn homesteading skills without internet. IsnÔÇÖt that ironic?
My family are aghast that I could kill something I cared for - I think itÔÇÖs so strange that they think that being a consciously oblivious consumer is better.
Hi Laura,
IÔÇÖm glad that this post helped! I find a ton of great info online and IÔÇÖm very thankful for the folks who take the time to post it too! It does seem ironic, but when you think about it, so many of these skills have been lost by the majority of our society. So we may not have someone close by to teach us. I am glad to know that there are people who read my posts so that they may learn these skills. čÖé
I understand completely! I have met quite a few people who think it is awful that I kill my chickens, and yet they buy McDÔÇÖs burgers and deep fried chicken ‘nuggetsÔÇÖ with no thought for the animals that were abused by that system. IÔÇÖm very proud of you for making the conscious decision to provide meat for your table!
Thanks for reading!
I have a question, is it legal in US to make your own meat form a living animal at home? I am a Muslim and therefore I have only eat chicken that is cut right.
Hi Master Panada,
It depends on where you live. You would need to check your local ordinances. Where I live I can process poultry and rabbits, but not larger animals. If you live on a residential zoned property, you most likely can not process your own chickens legally. But if you have friends who live on an agricultural property, you might be able to process them there. Best wishes!
Great article. This will be very helpful when I get ready to butcher having never done it before. Thanks so much.
Happy to share, Kris! Let me know how it goes when you try your first butchering session.
We bought our first ever “hens” at point-of-lay 7 months ago but ended up with 2 cockerels in the flock. They got on well until yesterday, when fighting started and they were injuring each other quite badly. My husband killed the youngest of the two this morning by the broomstick method which we had heard of and researched online. It was quick, clean and easy - luckily my husband did the killing part. Then over to me for the plucking and processing - again researched on Google. I decided to hang up the cockerel straight after the kill and dry pluck while it was warm, this was “relatively” easy, with a big tub underneath for the feathers to drop into. I made sure to take my time. After the plucking came the more gruesome part - at least for me - of cutting the neck off, and removing the innards. I did not like it at all, but am satisfied with the result and happy that I did it. Then I took the bird into the house, rinsed it in and out with cold water and placed it in the fridge to rest. WeÔÇÖll have roast cockerel the day after tomorrow! WouldnÔÇÖt mind doing this again if necessary, but would also like to witness the whole process live with someone who has more experience, to learn to do it quicker and to get better at it. Blogs like these are extremely useful, and itÔÇÖs great to pass on basic skills that most modern people are completely not familiar with anymore.
Hi Christel,
You go girl! Congrats on your first butcher session. čÖé I think itÔÇÖs great that you and your husband took on the challenge and were able to butcher your injured rooster. I have thought about doing a video of the whole process. The thought of doing all the editing, etc. is a little daunting…IÔÇÖd rather butcher a chicken than edit video. čśë But maybe someday IÔÇÖll get together the ambition to take on that project.
IÔÇÖm so glad that my tutorial was helpful and you were successful. Many people would wring their hands and let the rooster die a painful death. You did the right thing and learned a new skill. ItÔÇÖs not fun, itÔÇÖs not pretty…and it sure doesnÔÇÖt smell good, but it is how our ancestors survived and we may need these skills someday too.
Thanks for stopping by and sharing your first butcher session with us!
Can you supply this in paper form for the stubborn farmer who will not use a v omputer
Hi Debb,
Let me check into how to do that and IÔÇÖll see if I can get a printable sheet ready. It could take a little while…since IÔÇÖm not the most computer savvy person around either! čÖé Thanks for the suggestion.
If you donÔÇÖt like the skin you can skip the whole plucking process and just skin them, much faster.
Hi Chickeneater,
I have skinned them too and that is generally what I do if I am butchering just a couple of old laying hens. I hate to heat up a scalding pot for 1 or 2 chickens. I do think that keeping the skin on the chickens helps to keep the carcass a bit nicer in the freezer, and my dogs love the skin when we are done eating. čÖé So I use both procedures and find that they each have their pros and cons.
Thanks for sharing!
My mother would take an old chicken, dredge it in well seasoned flour, brown it in a little oil, then put it in a roasting pan and put sliced onions over it and roast in a 300 degree oven for a hour or so, it was wonderful.
(chicken was cut up, not a whole chicken.)
This was very helpful. Thank you.
Happy to help out, Justin. čÖé
I didnÔÇÖt know how much of this I could read, but as a virtual vegan (still eat some yard eggs from only caring hen-holders) I was curious as to how humanely one could handle this. I was not disappointed. I appreciate so very much your detailed description of how to receive the offering of this beautiful beingÔÇÖs life and body for you and your family, including your gratitude expressed to her.
Infinite supply and blessings for you and your contribution to the world.
Shannon
Thank you so much Shannon. It means a lot, especially since you are a vegan!
I finally got my first hens late this summer. I had been wanting them for YEARS. For now I am keeping them for the eggs but eventually will be wanting them for meat. Your post was VERY clear and very helpful. I am glad I found this blog!
Thanks so much! Glad it was helpful čÖé Thanks for reading!
ThatÔÇÖs a very good job, very informative. Everything taste better when raised, grown, and processed at home.
Why Thank You, Huck! I agree…it does taste better when you do all the work yourself!
I just found you through the homestead barnhop, and itÔÇÖs perfect timing because my husband and I will be getting some chickens from a friend who is culling their flock next month. We have to butcher them ourselves, though, and have never done it before! Approximately how long does it take you to butcher each one? Do you normally butcher more than one at a time? ItÔÇÖs only the two of us, so we donÔÇÖt want to take more than we can process ourselves in one day (our friends are culling 25 birds to make room for new layers!). They are stew hens, so I can just put them right into the stockpot or freezer? Thanks so much for your informative post!
Hi Joni,
It usually takes me about 20 to 30 minutes for each chicken. But I would plan on longer when you are getting started. I think the first time I butchered it took me around 45 minutes…on my own. With two of you, you can go faster. Maybe one kills, bleeds out, and scalds while the other plucks and guts.
If I have a chicken that is injured or is the only old one ready to go, IÔÇÖll do just one. But I usually have at least 4 or 5 to do in a day. I try not to do more than half a dozen in a day because my back gets really tired.
With any chicken (or other poultry), it is a good idea to let it sit in the fridge over night so the meat will be more tender. With stewing hens, it doesnÔÇÖt matter how long you leave them in the fridge, they will never be ‘tenderÔÇÖ unless you stew them or pressure cook them. I usually bring them in and stick them in a stock pot to simmer most of the day. Then I pick the meat off the bones and it is much more tender that way.You can put the bones back in and make a nice rich stock to freeze or can. With meat chickens I generally leave them in the fridge overnight and cook in the crock pot the next day, or freeze them the day I butcher. You can freeze stewing hens the same day too. But you want to leave the frozen bird in the fridge to thaw for a day or two before cooking, or it will be tough. Thaw the tough old hens and stew or pressure cook.
ThatÔÇÖs great that you are putting those hens to good use!
Thank you!
Certainly čÖé
Hi! We have thought about butchering our own chickens but have heard a lot of conflicting things about how to do it. As in - the beheading would be traumatic and make the meat tough or it is better to cut the jugular and let them bleed out which would make the meat taste better. I see that it can be done either way after reading the posts. The one think I havenÔÇÖt read about in your posts is saving the blood to use in cooking. I have seen it done on cooking shows filmed in other countries where it is considered a very important part of the meal for flavor. Have you ever tried it or know anything about it?
Thanks for the information. I will be checking out more of your site in the future!
Hi Laurie,
IÔÇÖm not particularly fond of the blood that cooks out of the meat, so I havenÔÇÖt saved it for cooking. I do feed it back to my chickens and they love it! I save the heart for hubz, the gizzard, liver, lungs for the dog, and the rest is fed back to the chickens. I used to throw the offal in our garbage (because my neighbor complained when a possum dug up some of the feathers. But I have gone back to composting anything that the chickens donÔÇÖt eat…basically the feathers and heads. The feet can be used for making stock. IÔÇÖve done this a few times…but usually they go in the compost too.
Good question!
Very interesting, excellent information for sure. I have been raising Cornish X each spring for the past 4 years, processing the birds at 9 weeks, with excellent results, several birds topping out at almost 9 pounds and on the low end at just over 4 pounds. I feed organic feed only and give them a run which I plant with a variety of greens including kale, swiss chard, clover, peas, nasturtiums and whatever else I can throw in there that I know is good, I also pick from my gardens and give it to them, I donÔÇÖt give much table scraps to my chickens because I believe they need their balanced feed more. I choose to kill my birds by hanging by the feet and cutting the jugular vein and letting them bleed out completely, this way, they just go to sleep, it seems so much more peaceful for them and me. They do flop at near death but I hold them so they donÔÇÖt bruise anything. I found this method on a U.S. University site when I was researching processing methods. The site claimed that once the spinal column was severed, the heart stopped which prevented them to bleed out completely. Like I said earlier, it just seems more peaceful to me but it does take more time for sure. This year I decide to raise a second batch of CX, so right now I have 32 one week olds in a brooder box on my kitchen table getting ready to go out to their coop/run. I keep them inside until the risk of pastey butt is past, itÔÇÖs just easier to keep an eye on them without continually running outside to check on them. They will be ready for processing at the end of October. This is the first time IÔÇÖve done birds at the end of summer so IÔÇÖll be interested to see how their weights will be, considerations will be shorter daytime hours so less time to eat as well as cooler temperatures so they may use up energy to stay warm. Thanks for your good information, keep it coming. Cheers
Hi Pauline,
Thanks for stopping by and leaving a comment! I always enjoy hearing about other peopleÔÇÖs experiences and I really like your idea of letting them forage on the greens youÔÇÖve planted for them. ThatÔÇÖs excellent advice. I like to keep mine in a coop with a pasture too, although they have grass to eat, not yummy kale, etc. čÖé
I have also processed them the way that you describe, by nicking the jugular and allowing them to bleed out. I have no problem with doing it that way, but I felt that it was over more quickly for them when I behead them. Personal choice…and as long as it is humane, IÔÇÖm all for it!
IÔÇÖve done meat birds in the fall several times and I really like processing them in October…the weather is nice and cool. The only downside is if the wasps are still buzzing about…there are more of them in October than early spring. I also like the fact that the weather is warm in the beginning when they need the heat, but cools off.
Thanks again for visiting! Let me know how you like the fall schedule for butchering!
“pasty butt?”
Hi Peg,
Pasty butt is a problem sometimes with chicks. Basically, the poop sticks to their butt and can build up to the point where the feces canÔÇÖt be eliminated, causing a slow death. čÖ?
I donÔÇÖt have any hens, yet, but when I do and I need to do my first butchering IÔÇÖll be back to read this again for help. So detailed and very useful. Thank-you
I hope you have some hens soon, Leonie! Best wishes with your butchering too čÖé
Hello,
Through the magic of Google I found this post today. I need to cull my flock, specifically a habitual broody hen, and I have no clue where to begin. This was highly detailed and I am so grateful for you for posting it. I appreciate that you thanked the chicken for its life, that just feels like something that should be done, almost like paying it forward.
Thanks, Melanie! Glad it was helpful čÖé
We have Black broilers that weÔÇÖll be processing in about two weeks. This is very helpful! Thanks!
ThatÔÇÖs great! Best wishes!
IÔÇÖm glad to hear it! The water should be at 145-150 degrees F…so try a thermometer next time and youÔÇÖll save the skin. I used to skin them, but they can be dry when cooked.
Great Job!
Excellent post! I was given a rooster this morning (looks just like the one in your pics) and I have looked over this post before. From start to finish it took me about 15 minutes to do the whole job (didnÔÇÖt keep anything from inside the bird) My water was just about to boil when I turned the fire off. I think it was too hot because a few patches of skin came off (so I skinned the whole bird) Excellent photographic examples! Thanks to this post I got my first rooster processed in no time!
Found this through LilÔÇÖ Suburban Homestead on Facebook. Very informative. Butchering is not pleasant but not so tough if you know what youÔÇÖre doing. Thank you for the good information.
Thanks…thoughtful and smart…I may try soon…
Hi Lewis,
Glad to me of help. Hope it goes well for you!
Thanks Kathy čÖé IÔÇÖm glad that this post has helped. I think that seeing it in person is best, but having step by step photos helps a lot. I probably should have done a search before I started with my first solo butcher. Having helped my Dad as a kid was pretty good experience, though.
The hardest part is actually swinging the ax or cutting the arteries to kill the bird. Once itÔÇÖs dead, I have no problem with the rest.
Nice post Lisa, IÔÇÖve always wondered how to butcher a chicken and thought it would be most intimidating. Now I can get my brain wrapped around the process a little better. Thanks.
I am just so glad that I found your blog! Very helpful post. IÔÇÖm glad you mentioned that you can freeze the birds right away, if youÔÇÖre doing more than one bird I think that would be the best way to do, rather than have a bunch of birds in the fridge that are going to freezer camp anyway.
Have you ever canned your birds? I wonder if theyÔÇÖd need to rest before canning.
Hi Kim!
So glad to have you here! I think that letting your chicken thaw fully in the fridge allows the meat to tenderize like letting it rest overnight in the fridge. Young birds that are butchered and frozen right away thaw out and cook up beautifully! Stewing hens have to be boiled or slow cooked for a long time and then picked clean. I use the meat in casseroles, soups, chicken salad, etc.
I have canned chickens. I started out by butchering my birds and dressing them out. Then I put them in a big stock pot to cook down the same day. They are cooled in the fridge overnight and picked clean the next day. The stock goes through a sieve to be sure there are no bones. The meat and stock goes into quart mason jars. You add some salt (and seasoning if you want). Then process them in the pressure canner for 90 minutes at 10 pounds pressure. I have also canned plain stock for cooking too. I used the same time and pressure to be sure itÔÇÖs safe.
Happy chicken raising!
Awesome post! One of the best tutorials IÔÇÖve come across, definitely. Pretty much the same way we do it, except we use a killing cone, I remove the feet before gutting (yucky feet… Lol), and I find it easier to gut on a flat surface instead of hanging.
Totally digging your blog!
Hi Rae,
Thanks! I wash the feet off before I start gutting, and I try to dip them in the scalding pot too. I tried using the flat surface to gut, but found it harder to keep the intestines from spilling stuff out into the body cavity.
Thanks for stopping by and commenting! I always like to hear how someone else butchers their chickens čÖé
Lisa Lynn, thank you for sharing this necessary homestead skill with us on Seasonal Celebration Wednesday! Rebecca @Natural Mothers Network x
Happy to!
I have never butchered my own chickens, but I remember my parents and the neighbours getting together once a year for a day to harvest enough chickens for two families for a year. They got an assembly line going and the work went very fast. I know that one day I will be cleaning chickens for myself, and IÔÇÖm bookmarking your detailed tutorial. I only have experience cleaning rabbits and squirrels. It looks much easier to pluck feathers than to skin a squirrel. Perhaps practice makes better…
Hi Michelle,
It definitely gets easier and faster with practice čÖé IÔÇÖve butchered rabbits too but I donÔÇÖt know that plucking is much easier than skinning a rabbit. ThereÔÇÖs a lot of fiddling around with the little pin feathers. Although with a rabbit you end up with hair on the meat most of the time.
This is a great post! I have layers right now, but will probably be purchasing meaties within the next month or so. IÔÇÖve never butchered or killed anything, so needless to say IÔÇÖm pretty nervous about it. I love animals so much, but I know factory farmed animals will suffer more than any chicken I ever raise and butcher. I love seeing other peoples methods of butchering, hoping it helps prepare me for my own experiences.
Hi Monica,
Thank you! IÔÇÖm glad you are doing your research ahead of time. The first animal I butchered on my own was a meat rabbit. I did a lot of reading and researching ahead of time to prepare myself. It helped me feel more prepared and confident. But it didnÔÇÖt make it easier to actually kill the animal. But I can honestly say that the more you do it, the less difficult it becomes. Also, chickens are easier than rabbits.
Good luck with your meat chickens!
Although I donÔÇÖt keep chickens, my grandmother did and I never watched when she butchered. I always wondered what happened. This tutorial was a very tastefully done and IÔÇÖm glad I read it through. Thank you.
Hi Cassandra,
IÔÇÖm glad you were brave and read the whole thing! Blood always makes me a bit ill, so I surprise myself because I can do this. IÔÇÖm getting to the point where it is just blood from living things that bothers me now. Especially my own!
Thanks for commenting!
lol gonna do that
What a detailed post. For beginner chicken butchers we appreciate this. My husband harvested his first chicken last weekend and I think he did a great job. Given that the bird was 20 weeks (Dorkings mature at 26-30 weeks) and his dressed weight was only 650 grams he wouldnÔÇÖt have been easy to work with. The one major difference in the way we processed was that instead of the axe or neck breaking weÔÇÖve seen as most common, my husband opened the beak and pierced straight into the birds brain with a very sharp knife, then twisted the knife. I believe he twitched once and that was it. Death was instant. We too have chosen to process our own meat for the same reasons you have given - cruelty free organic and low carbon mile meat. čÖé
ThatÔÇÖs awesome! Congrats to your hubby for butchering his first chicken! I have read about ‘brainingÔÇÖ which is basically what he did, but I have never tried it. I was always afraid IÔÇÖd miss the tiny little brain and cause the poor thing to suffer! Perhaps IÔÇÖm over thinking that. čÖé
Glad to hear it went so well and you are raising your own meat for your family!
Hi there! “Braining” is the way IÔÇÖve done my chickens, using a funnel to drop them into. They pop their heads right out, the funnel proper holds the bird gently during the nerves doing their thing, and it gives the bird a good chance to bleed out well. It also relaxes the birdÔÇÖs feathers enough that dry plucking is a whole lot easier. I guess those little muscles holding the feather quills just relax easier. I had a thin bladed paring knife that I sharpened both sides of at the tip, would open the chicks mouth and just cut the spinal column, then quickly remove the head and let gravity do the rest. IÔÇÖve done up birds using braining and by decapitation methods, and both work very well, I guess itÔÇÖs just a matter of what you prefer. Thanks for a good tutorial!
I just cleaned my first chicken should I cover it in the refrigerator?
Hi John,
Sorry this might be a little late to help you out this time. Yes, it is better if you can cover the chicken with something to prevent it from drying out.
Best wishes!