

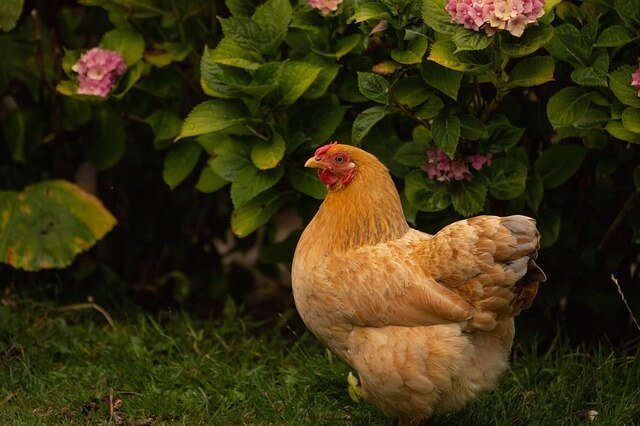
How to Butcher a Turkey or Other Poultry
Knowing how to butcher a turkey (or any other poultry) can save you a lot of money. You’ll also know that your birds were treated as humanely as possible. Sending them off to a processing plant is necessary for most states if you wish to sell the meat. However, if you are raising turkeys to provide food for your own family, you can do this job at home.
Check out my article Broad Breasted vs Heritage: What’s the Best Turkey for Your Homestead
This post contains affiliate links or advertisements. You won’t pay extra but I may earn a small commission if you purchase products through those links. Thank you for supporting The Self Sufficient HomeAcre!


Why I Raise and Butcher My Own Turkey for Thanksgiving
I am not a fan of the industrial meat system. In order to provide humanely raised meat for my family, I raise and process my own poultry. It is the only way that I know how those birds were raised and how they died.
We have been raising our own turkeys for Thanksgiving (and other meals) since we moved to our 1-acre homestead. I feel much better about eating our own humanely raised meat.

How to Butcher a Turkey - Getting Started
Be aware that butchering a turkey is a bit more difficult than processing chickens …mainly because of the weight of the bird. Have someone help you if lifting 20+ pounds is too hard on your back. I do this job by myself, so if you don’t have help it is possible to do alone.
The day before processing, remove all food from the turkey pen. Make sure they have clean water. If their food is not removed, it will be more difficult to remove the intestines without getting feces on the meat.
Killing Your Turkey
I kill my turkeys by chopping their heads off with an axe. It just seemed more humane to me than cutting through the arteries to bleed them to death.
You may choose to bleed your bird out so the heart will continue beating, removing more blood from the carcass. I didn’t notice that there was an appreciable amount of blood in any of the carcasses after decapitation. However, this is your choice.
If you choose to bleed out your birds, be sure that your knife is extremely sharp to reduce the pain for your bird.
I put my bird in an old feed bag to confine its movement. The head is pulled out through a small hole in one corner.
As an Amazon Associate, I earn from qualifying purchases.
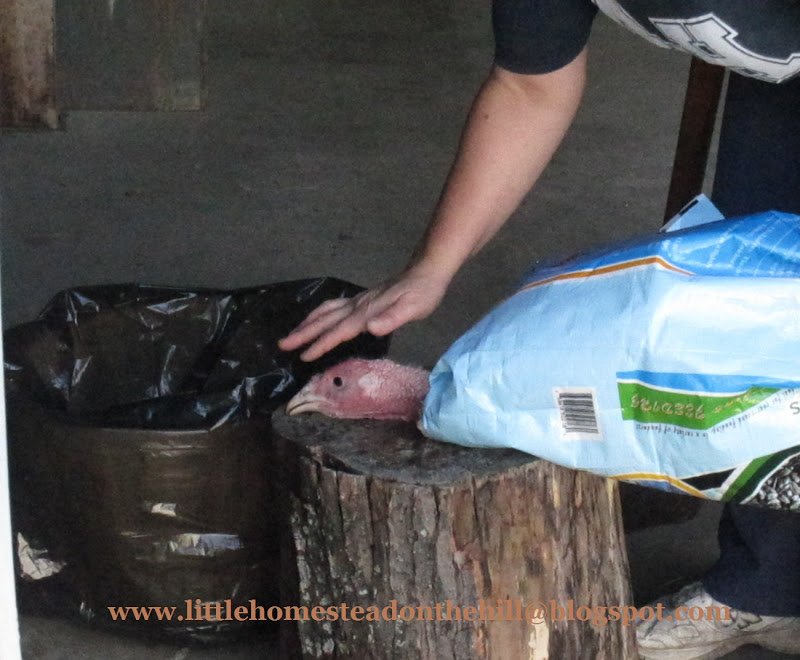 |
| Before I sever the spinal column with an axe, I pet the turkey to calm it down so it isn’t afraid. |
The spinal column is severed quickly and death is instantaneous.
The reflexes will cause the bird to struggle for about a minute after death. The bag allows me to restrain the bird until the muscles relax and stop moving. Without the bag, I would likely be cut up pretty bad by the talons.
If you are bleeding the bird out, you may wish to purchase or construct a killing cone to hold them immobile.
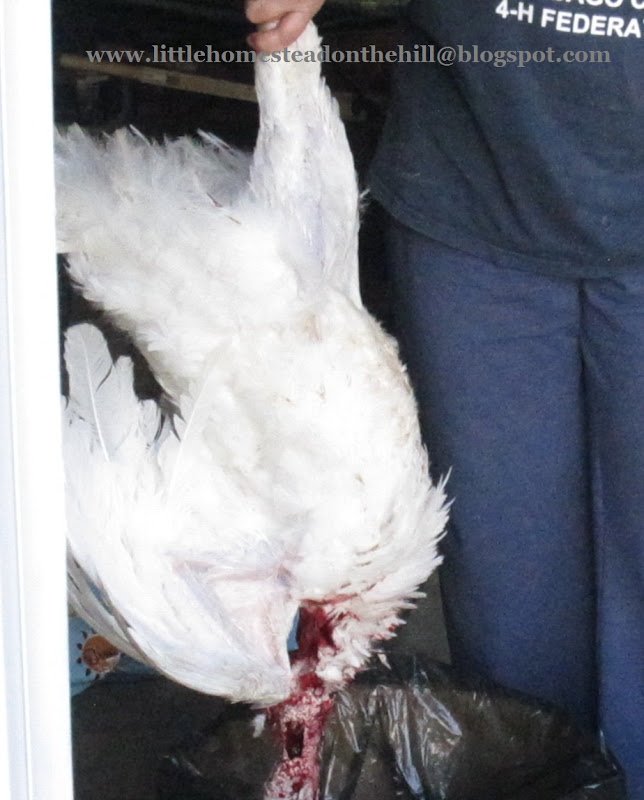 |
| You can kind of see that there are just a few pieces of skin holding the head on at this point. |
Cleaning the Carcass
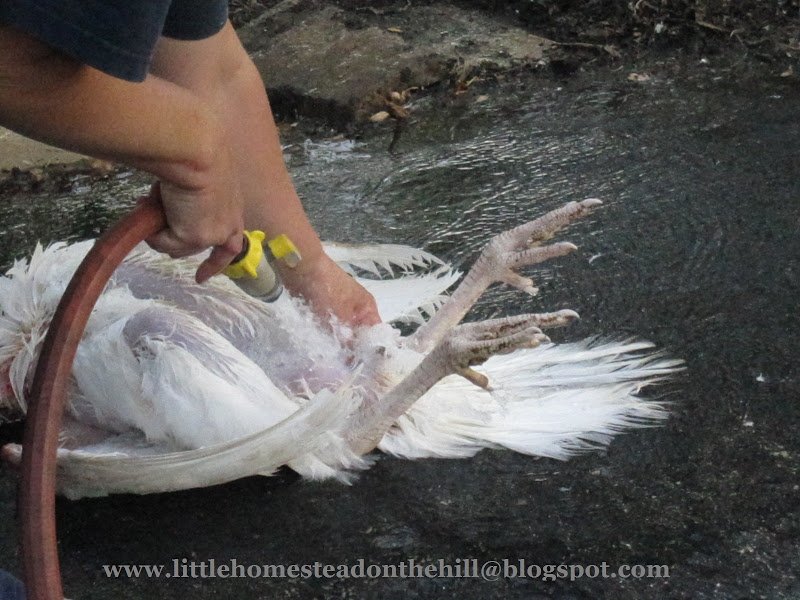
When the struggling is over, I wash the carcass thoroughly with a hose. Sometimes the bird will defecate in its death throes.
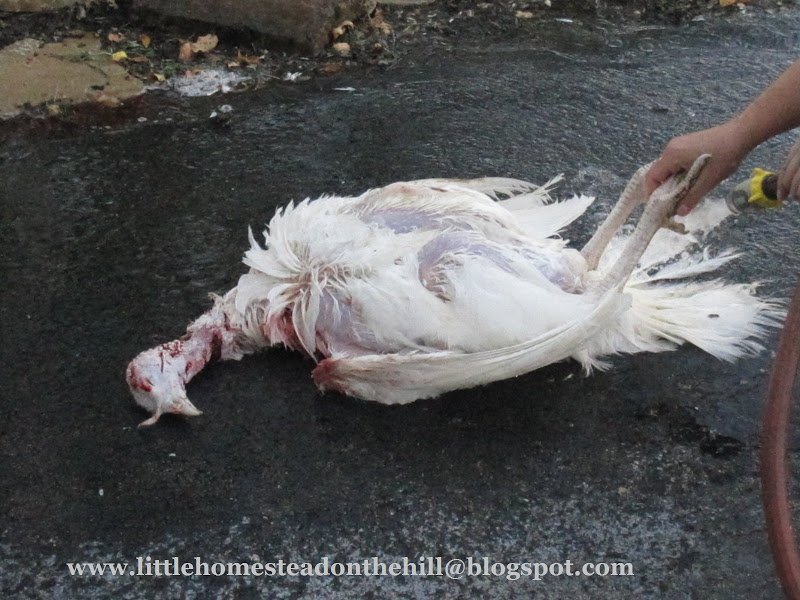 |
| After killing the bird, I wash it off to remove any dirt or feces from the carcass. |
 |
| I also press on the abdomen to force out any stool still in the vent. |
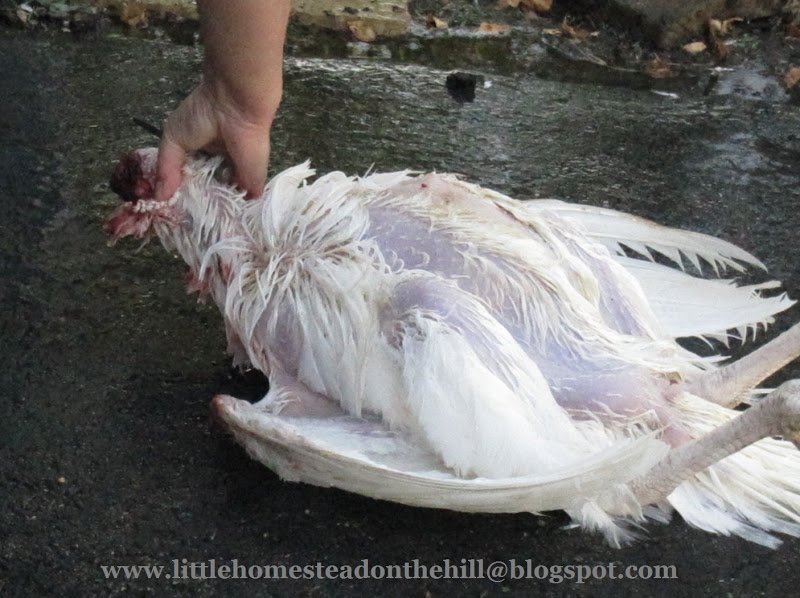 |
| After thorough washing, I remove the head by cutting any skin holding it on. |
If the head wasn’t completely removed from the neck with my axe, I remove it now with a sharp knife.
Scalding and Plucking the Feathers
Next, I dunk the bird into a pot of scalding water to make plucking much easier. The water temperature should be between 145F and 150F. Carefully dunk the bird in the hot water for 45 seconds to 1 minute.
Swishing it around a little helps get the hot water to the base of the feathers. You can tell when the scalding has loosened the feathers enough because they will come off easily if you run your hand over them.
Scald the feet too if you wish to save them for making stock.
You may add a drop or two of dish soap to the scalding water to help the water penetrate into the feathers.
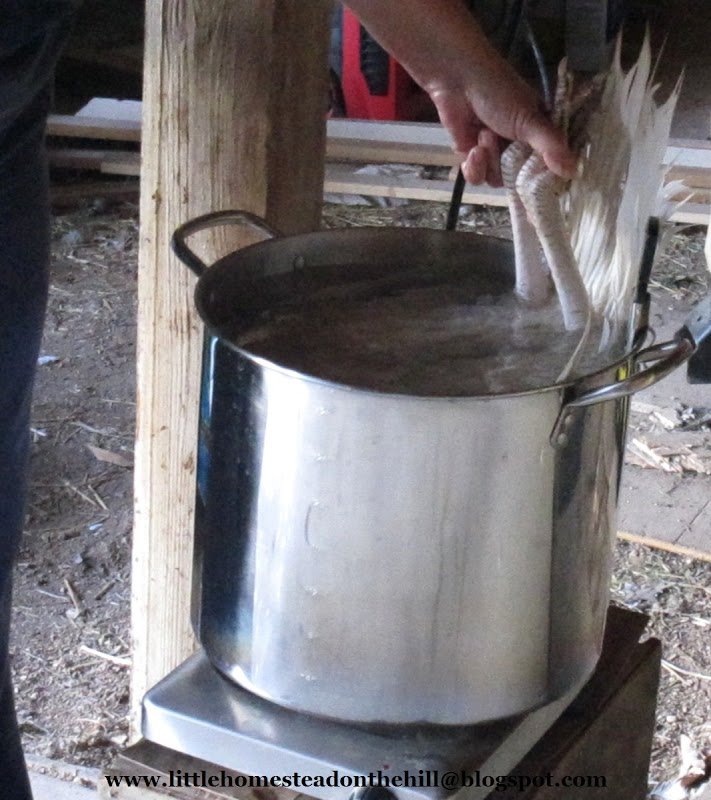 |
| The carcass goes into the scalding pot. |
Carefully remove the bird from the scalding pot and let the hot water drip off. Then hang or place on a flat surface where you can pluck the feathers. I use an old bushel basket lined with a garbage bag to collect all the stuff I can’t use.
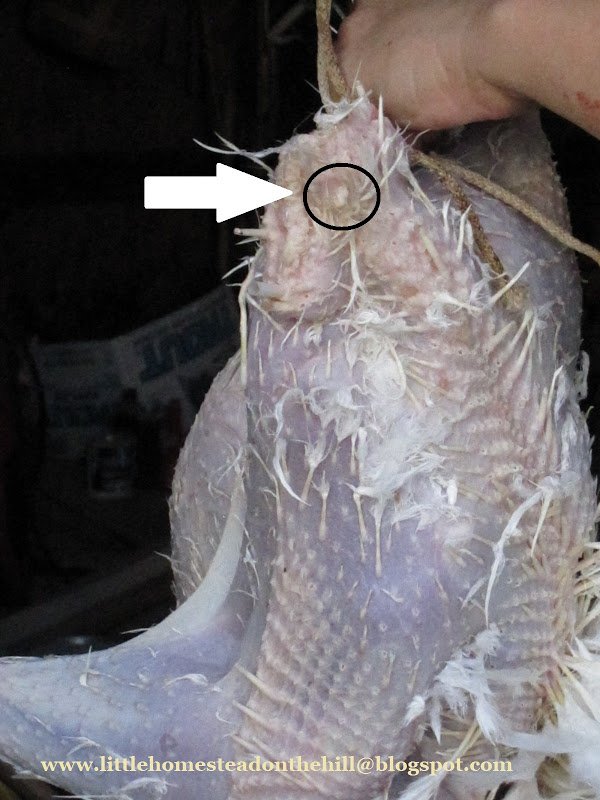 |
| I pluck the feathers and remove the oil gland on the top of the tail, shown in the circle. |
I try to pluck the majority of the feathers at this point, and then pick the little feathers more thoroughly when I’m done dressing the bird.
Removing the Oil Gland
You will also want to remove the oil gland at the base of the tail. I’ve read that it causes a funky taste to the meat if you do not remove it. Carefully cut around and under the gland.
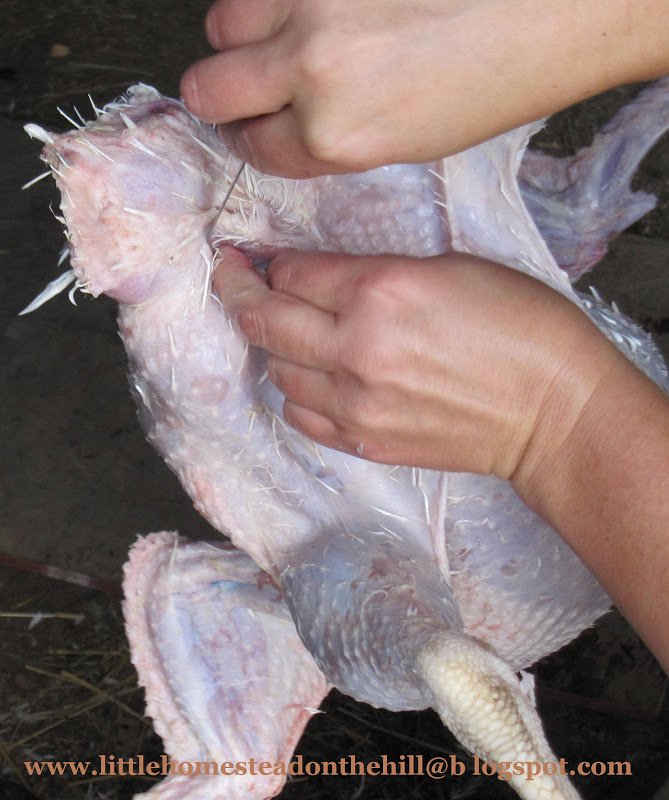 |
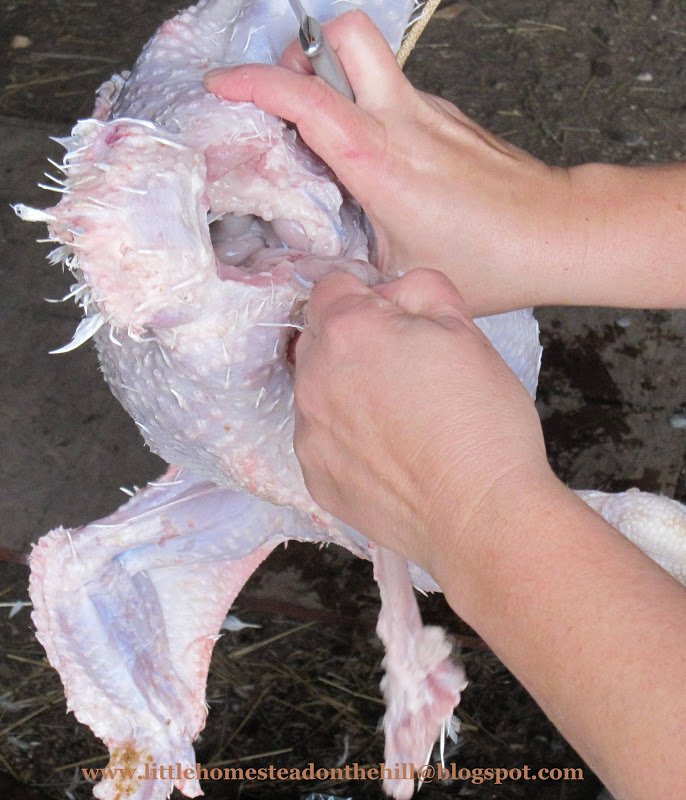
| To begin disemboweling the bird, cut all the way around the vent. Be careful not to cut into the vent and intestines. |
Disemboweling Your Turkey
To remove the innards, start by cutting through just the skin on the abdomen, a couple of inches below the vent. Slip the knife into this hole and cut all the way around the vent, being careful not to nick the intestines.
There may be some feces in the digestive tract, and you don’t want to get it on the meat if you can help it. If some does leak out, wash the carcass immediately.
 |
| Slowly and gently pull the intestines out to prevent rupturing them. |
Pull the intestines out slowly to prevent breaking them.
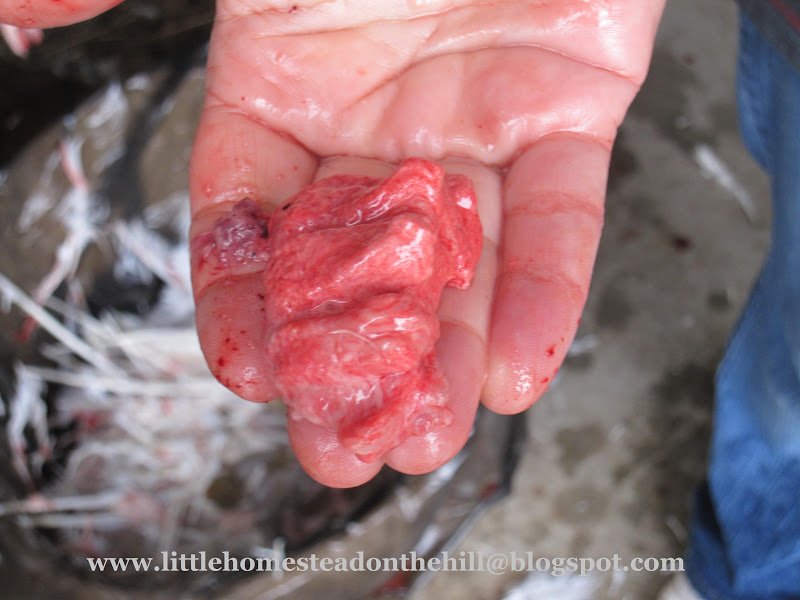
Next, you will stick your hand down into the body cavity and pull out the gizzard and liver.
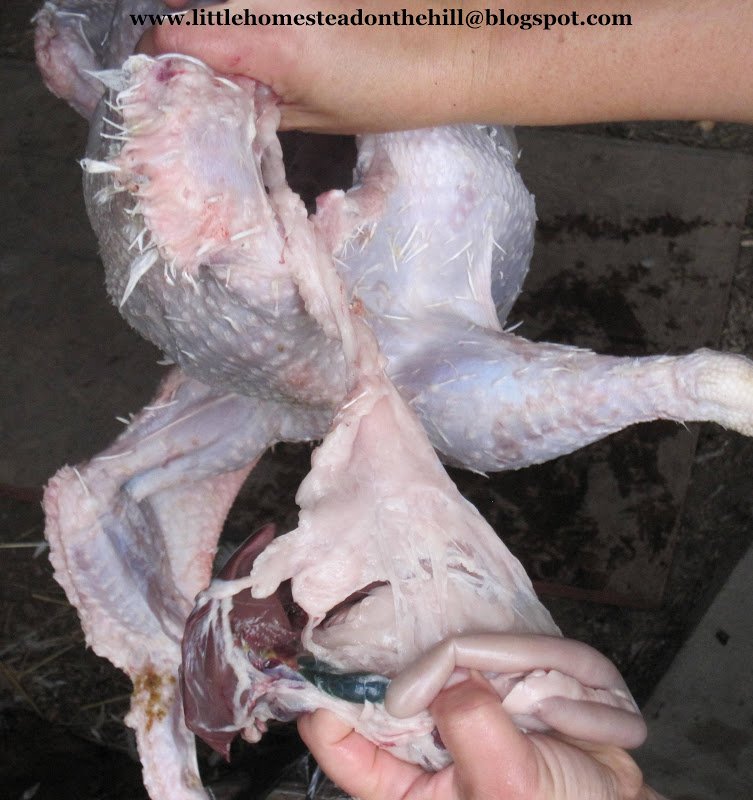 |
| After the intestines, you will find the gizzard and liver will usually pull out together. |
Remove the small green bile sack attached to the liver…do this carefully to avoid getting the bile on the liver (wash thoroughly if it does).
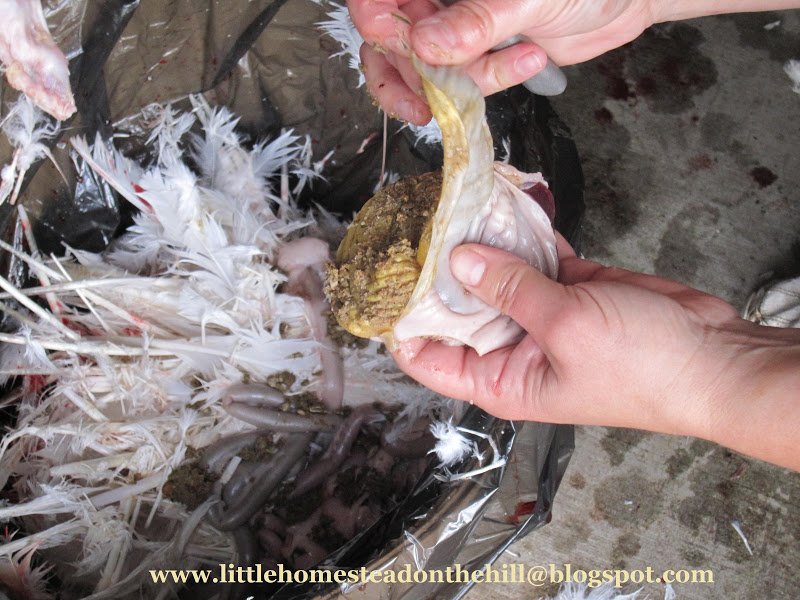
Cut the gizzard open to peel away the yellow lining…rinse thoroughly to get all the grit off.
 |
| When you cut the gizzard open, it will be filled with stones and possibly food. |
 |
| You need to peel away the tough, yellow lining of the gizzard. |
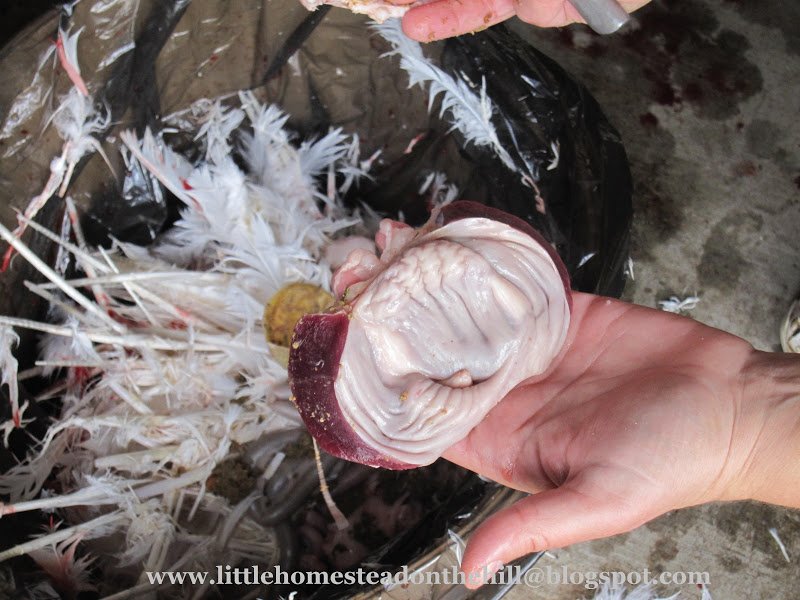 |
| Here is the gizzard with the lining removed. |
The heart will come out next and then the lungs.
 |
| The heart is deep inside the body cavity. |
The lungs are a little hard to locate the first time you do this. They are sort of tucked into the rib cage and you will need to use your fingers to gently pry the lungs out of the ribs.
Rinse the organs thoroughly and set aside.
 |
| You will also need to remove the lungs. They are tucked up into the rib cage and may come out in pieces until you have more practice. You can see the indentations where the ribs were. |
Once the organs are removed from the body cavity, you will need to remove the trachea (windpipe) and esophagus (throat) from the neck.
I cut a slit up the skin of the neck and then remove part of this skin, the windpipe, and the esophagus.
Next, remove the crop from the chest area by working your fingers between the crop and the skin. If you did not remove food from the turkey pen, this will likely be full of food.
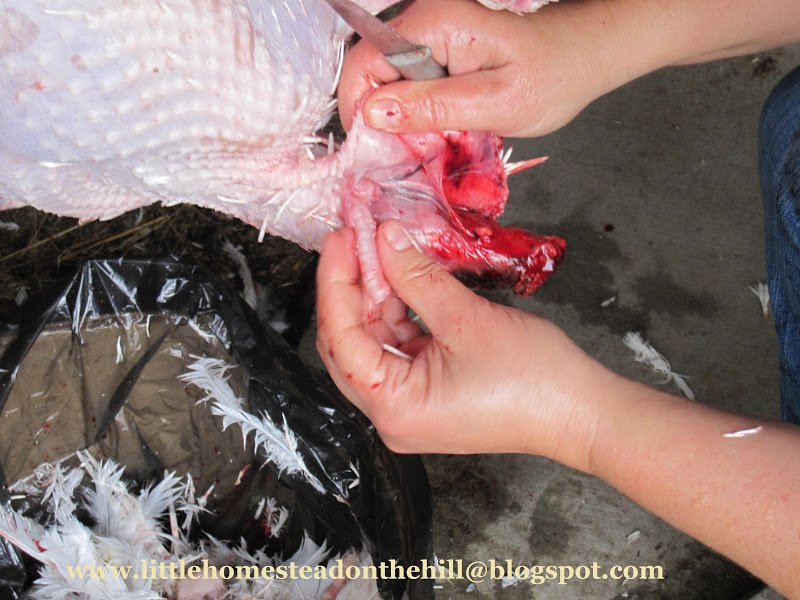 |
| The trachea and esophagus are easily removed when you cut the skin on the neck off. |
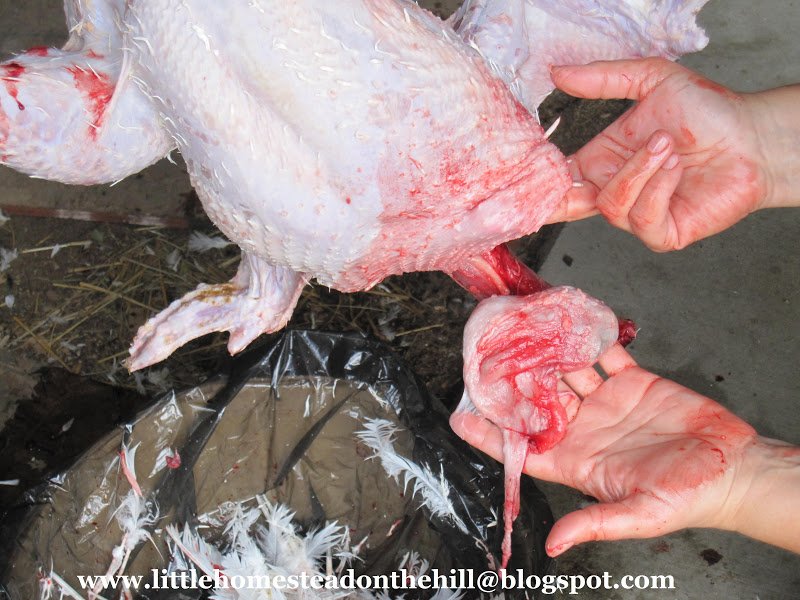 |
| Remove the crop by working your fingers between the skin on the chest and the crop. |
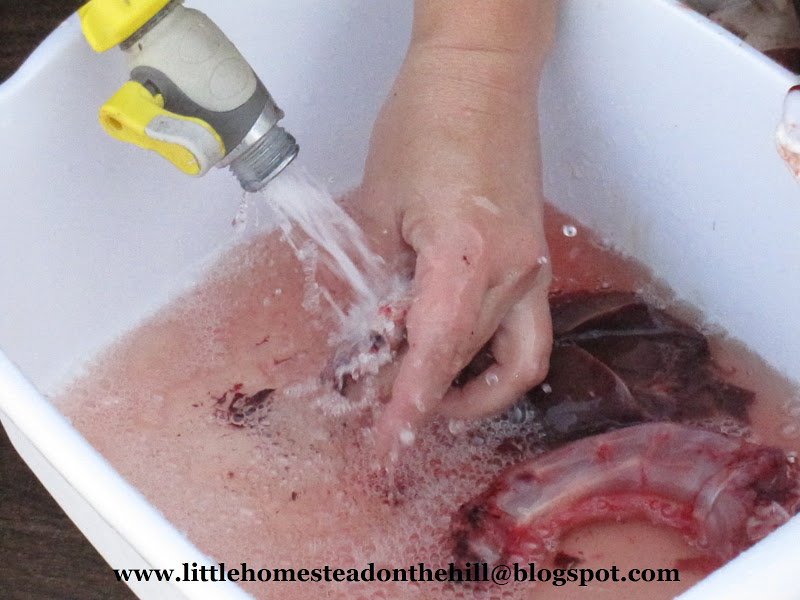 |
| Wash all the bits and pieces. |
At this point, I rinse the whole carcass thoroughly, as well as the bits and pieces. Run cold water over the bird and into the body cavity to help cool it down.
The remaining body heat can cause bacteria to multiply if you don’t cool it down quickly.
 |
| Thoroughly wash the carcass with cold water to chill the meat. |
Removing the Feet
Remove the feet by cutting through the skin and ligaments at the joint where the drumstick and scaley part of the leg meet. You don’t want to cut through bone, just through the tissue that holds the joint together.
The feet may be used for making a thick stock. After scalding, the scales and toenails should slip off easily. Rinse and save the feet for later.
How to Butcher a Turkey - Finishing Up
Now I spend a few minutes picking the remaining feathers off the carcass and cleaning the body cavity again with cold water.
When I take the dressed turkey in the house, I weigh it, tuck the gizzard and other organs into the body, and put the bird into a bag to freeze (the turkey roasting bags work pretty well, but if you can find a shrink wrap or vacuum sealer bag large enough, that is best) or into brine to soak for 24 to 48 hours before roasting. It is important to let the meat rest in the refrigerator at least overnight before cooking, or it will be tough. If possible, butcher 2 days in advance.
Brining Your Turkey
To make a brine solution, use 1 cup of sea salt to 2 gallons water. Add honey, maple syrup, or sugar and poultry seasonings such as sage, thyme, and rosemary for flavor. Soaking your bird in a brine solution overnight will produce a juicier bird.

I like roasting my turkeys in a large electric roaster. I think it makes for a more tender, juicier bird. However, it doesn’t brown the skin like roasting in the oven. A few pats of butter tucked under the skin will make your turkey nice and juicy too.
Roast at 325F for 3 to 3.5 hours for a 6 to 8-pound bird, 3 to 4 hours for 8 to 12 pounds, 4 to 5 hours for 12 to 16 pounds, 4.5 to 5 hours for 16 to 20 pounds and 5 to 6 hours for 20 to 24 pounds.
They used to say that if the bird is stuffed, increase the roasting time by 30 to 45 minutes…but now food safety experts agree that you should not stuff your poultry, but rather cook the stuffing on the side.
A meat thermometer should register at 180F when the bird is done, and the drumsticks should move easily in their sockets. The thickest part of the drumstick should feel very soft when pressed. Allow the turkey to stand for 15 to 20 minutes, covered with foil, before carving.
As an Amazon Associate, I earn from qualifying purchases.

* I originally posted this article on my old blog, Little Homestead on the Hill. Hence the credit on the photos.
Have been processing turkeys for years. This is the first year with plucker and scalder. What a difference! We tube our turkeys and give them some red wine or Southern Comfort to get them a little woozy, then they just don’t care.
Hi Katie,
I’ve never tried giving my poultry a drink to calm them down! Thanks for the tip 🙂
Have a great Thanksgiving!
They are so relaxed they just don’t care. We tube them and just let them hang out until the alcohol hits their system. They might stagger around or just settle down. Very little struggle.
Thanks for the article, its very informative!
Question though:
I am about to receive a turkey that was slaughtered yesterday, and has been in a 5 gallon bucket of ice water and will be for another 24 hours, is this a good way to store the bird until I receive it tomorrow? It may be submerged for 3 days by the time I get it, is this OK and what should I do as soon as I receive it( keeping in mind I will be cooking it 2 days after getting it).
Please advice!!!!
Thanks in advance,
Chris
Chris,
I am sorry I did not see your comment sooner. Ice water should be okay, just keep adding ice as it melts. I hope it went well.
Hi Lisa
We butchered our turkey today and now upon reading a bit more it looks as though we may have done it too soon. We have a 38lb turkey and will need to start cooking it early Thursday am. Can u give me advise on how to persevere it until then. From what I have read it can only be kept in the fridge for 2-3 days. Also do u have any thoughts on hanging the bird to help with taste?
Thank you
Jessica
Jessica,
I’m sorry I didn’t see your comment sooner. People used to keep their meat longer than 2 or 3 days…although I don’t know if it is considered safe.
I hope everything worked out okay.
Hi, Quick Question,
Are you saying to Brine for 24 to 48 hours and then leave the turkey in the refrigerator overnight…. or that you need to leave turkey to brine at least overnight?
Thanks!
Hi Emily,
I would leave the turkey in brine overnight, but you can just brine it for a couple of hours if that is easier for you. You should wait 24 to 48 hours after butchering before cooking.
Happy Thanksgiving!
So… Just to be straight.. Butcher Turkey, deafether and whatnot, put in fridge for 24 hours, brine for 24 hrs, then cook turkey.
Sorry, and
THANK YOU!
Ugg Butcher Turkey, defeather and whatnot, put in fridge for 36 hours, brine for 12 hrs, then cook turkey.
Yes 🙂
Thank you for your article. Very helpful. My question is….we discovered our turkey had an injury on its leg and wing. Looked like one of the goats horned it real good. The flesh around the wound did not look good. I removed the leg and wing during butchering process. Should I be worried about the rest of the carcass? It looked and smelled normal.
Hi Dave,
I would still use the meat. It should be fine. Just cook it thoroughly.
Glad the article was helpful!
I have butchered a couple of turkeys in the past, and butcher chickens, ducks and rabbits more regularly, I have read to age the carcasses of the smaller critters for at least 3 days to a week to relax them. I usually just pressure cook them as our fridge is very tiny. However, recently we acquired an extra Royal Palm male and we are planning on butchering him near the end of October- we have several outdoor refrigerators, that are not hooked up, and we are hitting 27 F nights now, and we use them to store dry goods. So we were planning to age the turkey in one of these units, and figure there should be no problem. How many days should a tom turkey need to age? I think I just cooked the others (it’s been years) very low and slow, (250 F for 12 hours, which works for just about anything, but we are going to be taking him down to family on a much needed vacation and they wanted to have thanksgiving early with us, so we are providing the turkey and they are cooking him. The trip should take about 8 hours (in a cooler on ice). I just need to know how long before the trip I should butcher so he ages and softens up.
So,my5y.o.andIbringastandardbronzpolthomeinMaytotolivewiththechickensandnamehim,Thanksgiving.Thishasbeenquitetheadventure.Werosetotheoccasion,planswemade,changed.Weadaptedandovercame.Ifoundyour
Len.landers
Hi Len,
I think there was a problem with your comment. Let us know what happened to your turkey, Thanksgiving!
We’re preparing to butcher our first turkeys on Monday. I have to work all day on Tuesday and Wednesday, so, is Monday too soon for butchering and brining to use on Thursday for Thanksgiving? I guess if we wait til later in the day to butcher, we would really only be keeping them in the brine for a little over 55 hours. Is that too long?
Hi Teri,
Monday (later in day might be better) is not too soon to butcher, but I don’t think that I would put it in the brine solution until Wednesday. Just put it in the refrigerator in a bag to keep it from drying out. I think soaking it in brine for that long might be too much…but I’ve never tried it.
Have a Happy Thanksgiving!
Hi Lynn,
I am so glad to fine your sight have been looking. You answered my question about butchering Turkeys now I need to know how old is a hen when she starts laying, I have two that is 8 months old no eggs, they are awful fat I think , they wobble when the walk and when I feed them you would think that I was starving them. The breed is bronzs ( sorry if that is miss spelled )I have added you to my favorits. Hope someone is able to help me.Thank You.
Thanks so much for reading my post! I’m glad to have you here. 🙂
If your turkey hens are the Broadbreasted Bronze variety that is bred for meat production, they do have a large appetite and will eat until they are very fat. This is good for raising turkeys to butcher weight quickly, but not good for raising turkeys for breeding for future generations. If they have gotten too fat, they may not lay well. (From your description, it sounds like you have the Broadbreasted Bronze turkeys.)
If they are the heritage Bronze turkey, then it sounds like maybe they have just had too much food available and have eaten more than they should, which could also impair their ability to lay eggs…the same goes for chickens and other poultry. When they have too much fatty tissue in their abdomens, they won’t lay very well.
Usually, turkeys are not ready for reproduction until their second spring. Since they are 8 months old, you probably won’t see eggs from them until next spring. Do you have a male of the same breed? If your tom turkey is a Broadbreasted Bronze, he probably won’t be able to successfully mate and fertilze eggs…they have too much breast meat and it gets in the way of natural mating. The meat turkey industry uses artificial insemination to breed their broadbreasted turkeys.
Now, this is not to say that you can’t keep your turkeys and get some offspring from them, but it is not as likely as if you were keeping heritage turkeys, such as the heritage Bronze, Black Slate, Bourbon Red, etc. The trade off is that the heritage turkeys take longer to reach butcher size and they never have as much breast meat as the broadbreasted breeds.
I hope that this is helpful! Let me know if you have any more questions. 🙂
THANK YOU, THANK YOU! This post was amazing. We butchered our first Turkey today. I took notes from this post and had my phone at hand for photo consultation. Absolutely fabulous information thank-you. We certainly didn’t do things by halves our bird weighed in at 46.4lb. What a Thanksgiving we are going to have!!!!
Hi Nina,
I’m so glad that this was helpful! Thanks so much for reading 🙂 Sounds like you will have a huge Thanksgiving feast! Will that bird fit in your oven? Best wishes!
Hello again! We have upscaled since our initial comment in 2015 and I am back to your post for info! We have 17 turkeys this time. Tomorrow I am testing one of the biggest ones to see what it weighs.
I am still reading and re-reading your steps!
This time we have splashed out and bought a plucker!
Thanks again for your detailed post, I really appreciate it.
Also…..our 46.4lb turkey did not fit into the oven! We processed the second one and at 26.4lbs she just about fit in. We had to quarter the big one, he didn’t taste great, a little tough but we still enjoyed him for many many meals!!!
Hi, I am a newby at Turkey butchering. We are getting ready to do our first batch. We have been able to scald our meat birds in our 30 qt turkey fryer but I know that isn’t big enough for my turkey. How big of a pot do you use???
Hi Heather,
If you have broad breasted turkeys, you will probably need a bigger pot. I have a 5 gallon stock pot and it is big enough for the heritage turkeys, but not the broad breasted breeds. I have to turn them over and do the ‘head’ end then the ‘butt’ end. It’s a bit tricky. I have been thinking that I should look for an old laundry tub for scalding the big turkeys. I hope that this helps!
!
Thank you! And yes that does help. My guys our broad breasted but I think I will do heritage breeds next time. Thank you again.
Glad to answer questions, Heather! I hope all goes well and you enjoy your home raised turkeys!
Hello all, I am raising 11 turkeys for this fall’s feasts, and having fun doing so. 5 are BB, and 6 heritage.They are now at the age of flying over the fence, so I herd them back in every day. They are sure an interesting bird to observe. When I was young, I worked at a poultry farm in the butchering room, so have no questions, but agree with all that this blog is very helpful.
Thank you very much, Charlie! What an experience to work in a butchering room!
You may be able to keep your turkeys in the pen by trimming the long feathers on one wing. This makes them fly in more of a circle. As they get bigger, they will have trouble getting over the fence…at least the broad breasted ones will. 🙂
Thanks for sharing and I’m glad you stopped by!
This was very helpful thank you so much! Just one question… how do you get the turkey into that feed bag?.
I’m glad that this helped, Sophie! Getting the turkey into the bag is easiest if they have been socialized and are used to being handled somewhat. But it still isn’t particularly easy. If they are a bit wild, that may be the hardest part of the job. You could use a killing cone and nick the arteries to bleed them out if it is easier.
I find a couple wraps around the body of the the birds to keep down the movement when slaughtering with duck tape works just fine, allowing the legs to kick to help in the blood removal , but limits the thrashing around.
I bet it works for ducks too 😉 Great tip, thanks for sharing!
Tonight was my first time butchering anything at all and I had no one to help me so massive thank you!!!
Good for you, Jess… Congrats! I’m really glad that I could be of help!
Thanks for the tutorial. I’ve butchered some of my banty roos, but was disappointed how little meat is on there when they free-range. So i bought Heritage turkeys and its now almost a year, so it’s time for some toms to go. I wanted an easier way to butcher such a giant bird. After reading your post, I realize I don’t have enough supplies. I didn’t need to heat my banties to pull feathers. Is it because the tom is so much larger or because turkeys retain their feathers better?
Hi Lynn,
I think that a banty will have very little meat, no matter what you do. You can pluck your turkeys without scalding, if you like. The feathers just come off much easier if you dip in scalding water. The wing feathers are the most difficult to pull. I haven’t raised or butchered any banty chickens, so I can’t say if they are easier than other poultry to pluck. The most difficult, that I’ve encountered, were ducks. They have so much down!
Best wishes with your turkey butchering session!
Lisa, this was an excellent tutorial - didn’t think it would be so easy to follow in photos versus video - but it was! You did an excellent job! Thank you.
Thanks, Linda!
I like the food bag idea. I have a “killing cone” I use for my chickens and that works fantastic. I have not raised turkeys, hubby doesn’t want to. They are so big I am not sure I could butcher them by myself. Our neighbors used to raise them and a few years ago gave us a 42 pound turkey for Thanksgiving.
Hi Joann,
I didn’t let my turkeys get to full size before butchering. I think the largest dressed out to 19 pounds. 42 pounds would be more than I could do on my own…you really need some help with a big bird like that!
Lisa Lynn awesome post! I like that you don’t pretend its so easy and share the difficulty of the logistics with this task. I also think its important that we learn how to do these things for ourself. I may butcher and clean a chicken this year because I think its important for me to have the know how also I have one that I think has stopped laying the sad part is she is not very meaty. Thanks for linking up to “The Ole’ Homesteading Trading Post” monthly blog hop! I always learn so much from you!
Thanks Kristy Lynn! I’m so glad I found your blog hop (through the Montana Solar Creations blog, I think)
wow! good on you!! i have to admit, i had to steel myself to look at the photos so i didn’t read to closely - but if i ever decide to butcher my own turkey i’m comin’ to you! 🙂 i think killing your own meat in an ethical way is one of the best ways to bring you closer to the source of your food. i’m proud of you.
thank you for sharing with us at the Wednesday Fresh Foods Blog Hop! i hope to see you again this week with more seasonal & real/fresh foods posts. xo, kristy
I’m so happy that this post is helpful to others 🙂
Paula, I can’t wait to hear how the turkeys work out for you!
Great post as always 🙂 Will definitely be having another read before we process ours. AS this is the first year we’ve raised turkey’s too.
We’ve butchered our own chickns and ducks, but always good to read of someone else’s experience, especially the differences between the species
Yes I am, I am anxious for next spring to come now.
Thanks everyone 🙂 Paula, that is wonderful that you were able to bring home two free turkeys! Are you going to keep them and breed them?
April, thank you so much for nominating me for the Liebster award, I’m honored 🙂
Great how-to! People need to understand more about their food and I think more people are trying to get back to clean eating and knowing where their food comes from. I’ve nominated you for a Liebster Award - see more here - https://www.aprilscountrylife.blogspot.com/2012/10/ive-been-nominated.html
I just found your blog from Homestead Barn Hop and the turkey post is just what I need. I can see I will be reading your entire blog from the beginning. We got a pair of Bourbon Red turkeys to breed off of craigslist for FREE last week. The tom is 4 yrs old and the hen is 3 years old. The couple bought them for their grandchildren who got tired of them. I’ve been wanting to get some turkeys but because of the cost just never did. I kept telling my husband that when the time is right I will know. God always comes through.
Excellent tutorial!
Another blogging buddy did a post on processing a deer today. All the blood and guts seems to be just in time for Halloween! 😉